![]()
Revised: 11/25/2020
How to Process 1099s for AP
For 2020 there is a new 1099 form, you may need to file both a 1099MISC &
1099NEC
Do not start your 1099 Process before receiving your 2020 end of year update.
You will need to Pull 1099 Information after you receive your software update.
To start the 1099 process you will need
Financials version
16.190.5.1 or higher and
be using the V16 Section 8 program 16.190.5.1.
Do not pull the Section 8 1099 data using the old V11 program.
You may also watch this How To Video on Vimeo https://vimeo.com/485688182
These are the easy to follow step by step direction for 1099 Processing. This will use the most basic steps commonly used by Horizon Customers. Please also see the more detailed instructions at FS_How_to_Process_1099s
NOTE: If you have AP and Section 8 data, Horizon recommends that Section 8 data
is pulled first and verified/corrected, then add AP data.
CAUTION: 1099 data is often stored in the same file, both AP and Section 8
information will combine unless different values in Add to Reporting Group are
used. Section 8 and AP staff should coordinate who will run Remove ALL 1099
Information in Work File before Pulling to delete last year's information and
who will Add to Work File.
It is also recommended that all 1099 information for the same Federal ID, state
ID are pulled into one company. If there are multiple companies in Horizon, but
these are for the same Federally recognized company that has one Federal ID,
combine this information into one place by using the Add to Company option.
Before pulling, please verify that vendors using a Social Security number as the
Federal ID and using their personal name not a company name have their name
entered in the fields for Last, First, Mid, and Suffix.
* This is not required if submitting paper copies to
the state of Pennsylvania. However, most Horizon customers are now required by
PA to file electronically.
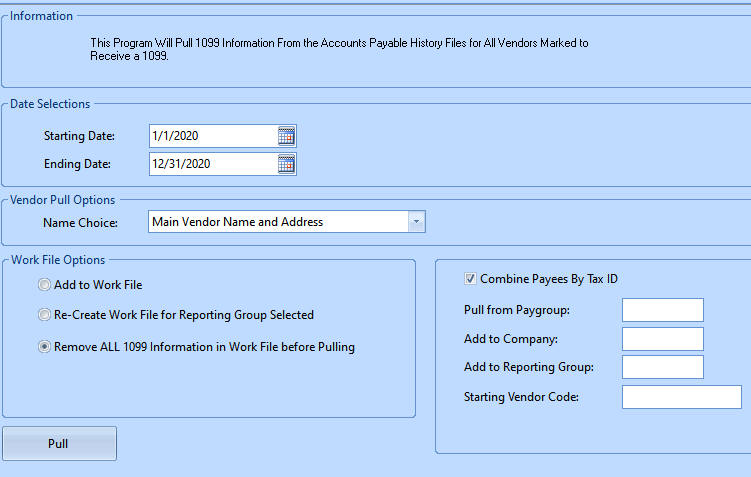
Pull the 1099 File
Go to Utilities>>Pull 1099 Information
On the Pull 1099 Information view
Vendor Pull Options
Select the vendor pull option:
The vendor pull option depends on where you have the information entered in the
vendor master for your 1099. If you only use the Check Information address
lines, use #1. Many customers use #3
1099 Name Line and Address
Work file options
Select Combine Payees By Tax ID
Click on the Pull button. (If you are not
satisfied with the outcome, you may go back and edit the Vendor Master, or Void
checks then re-pull (re-create) the files. Be careful if Section
8 information
has already been pulled as you could wipe out that information as well.)
Edit the 1099 Information
Go to Utilities>>Edit 1099 Information.
Review 1099 Name Control Information
Go to Utilities>>Review Name Control
1099 Final Edit List
Go to Utilities>>Final Edit List.
Print 1099 Forms
Note: Users should make sure they have an updated version of the Financial
module to ensure that the printed 1099s comply with current requirements.
Formats with "Complete" in the name may be previewed to review before printing.
Go to Utilities>>Print 1099 Forms
Electronic
Form Mode: Select the Form to Print:
MISC, NEC, or INT
Warning: Changing this selection will also change the Format information
selected to the Pre-Printed version.
Top Adjustment and Left Adjustment: To be used for printing on Pre-Printed
forms such as the IRS Red Copy.
Format Information:
|
Format Description |
Print On |
|
Preprinted Form |
Pre-Printed Red Form |
|
Complete Copy B
For Recipient |
Blank Front, pre-printed |
|
Complete Copy C
For Payer |
Blank Front, no instructions – |
|
Complete Copy 1
For State Tax Department |
Blank Front, no instructions – |
|
Complete Copy 2
File with recipient's state tax return |
Blank Front, no instructions |
PRINT: When all information has been entered and all selections are made you may
Print. Click “Print with setup” to
select a printer and options, or Click “Print” to allow default to your default
printer.
·
Print 1 set of forms
·
Review your pages for any problems
·
Select the next format needed then print
·
Repeat until all copies are printed
·
Recommended: Use the Export – PDF or Email options to save a copy of the 1099
forms to a PDF file for future reference or printing. Use the Complete Copy B
For Recipient or Complete Copy C for Payer.
Save the file to a safe location that will be backed up.
Create 1099 File
Go to Utilities>>Create 1099 File
If you are submitting your 1099 information electronically to the IRS, there is
no need to print the red copy of the 1099 or the 1096.
NOTE – make sure the name control field is filled in on all 1099 records…see Review
1099 Name Control Information
There a 4 file types created in this process based on the field selections in
Agency Mode and in Form Mode.
|
File Created |
Where to submit |
Agency Mode |
From Mode |
|
Federal MISC |
IRS at https://fire.irs.gov/ |
Federal |
1099 MISC |
|
Federal NEC |
IRS at https://fire.irs.gov/ |
Federal |
1099 NEC |
|
PA MISC |
PA E-TIDES at https://www.etides.state.pa.us/ |
State/CSV |
1099 MISC |
|
PA NEC |
PA E-TIDES at https://www.etides.state.pa.us/ |
State/CSV |
1099 NEC |
Upload the file you created to the https://fire.irs.gov/
or to PA E-TIDES at https://www.etides.state.pa.us/
11/25/2020