![]()
![]()
Revised: 11/17/2015
Go to Check Processing>> Check Processing Wizard
In this program vouchers may be selected or voucher selections may be changed, the pre-check report may be previewed or printed. Checks and deposit slips may be printed, accounts payable checks may be processed and posted.
How to Pay Regular AP Vouchers
Enter or select a Check Book ID for the check run. If the pay group is selected first the Check Book ID will auto fill.
Enter or select a Pay Group. Only vouchers for the pay group selected will have checks created.
The pay group and the check book ID must be compatible or the program will not advance.
If the pay group is left blank, the program will create checks for all selected vouchers with pay groups compatible with the check book ID selected.
Enter or select the Payment Date for the checks.
Enter or select the Check Date for the checks. This is the date that will print on the checks and will post to the general ledger.
Users that have already selected vouchers using the Check Processing Wizard or one of the voucher selection programs will be displayed in the window. Insert a checkmark in one or more of the boxes to select the user and their vouchers.
If vouchers were not selected, this window will be blank.
Vouchers may be selected on the Check Processing - Voucher Selection/Pre-Check Report page of the wizard.
Click the Select All button to select all of the displayed users.
Click the Unselect All button to remove the selecting checkmarks from all of the displayed users.
Click the Next button to move on to the Check Processing - Voucher Selection/Pre-Check Report step.
If there are un posted checks in the program an info box will ask "Checks already exist - Recalculate?"
Answer "Yes" and the program will recalculate checks based on current selections and/or changes made. Information for checks that have already been printed will be lost. The program will move to Check Processing - Voucher Selection/Pre-Check Report
Answer "No" and the program will move to Check Processing - Check Verification
Clicking the Close button will close out the program. Users will be asked to save to cancel the check process.
Selected and unselected vouchers for the pay group will be displayed in the voucher selection grid.
In the X column, click in the square to place or remove a selecting checkmark or use the Select All and Unselect All buttons to select/unselect vouchers.
The amount to pay for each voucher will be displayed in the To Apply column for a checkmarked voucher. The amount may be changed to reflect a partial payment.
Discount information will be displayed and may be edited for a selected voucher in the Dsc Take and Discount columns.
Place a checkmark in the Sep column to indicate the voucher should be paid to the vendor on a separate check.
The displayed Description may be edited.
Other voucher information displayed:
Amount
Voucher (number)
Due Date
PG
Invoice #
Vendor #
Vendor Name
Invoice Date
Displays the total amount that will be paid for all selected vouchers.
Displays the total of the Dsc Take column for the selected vouchers.
Displays the total cash required to pay the selected invoices.
Click the Rebuild Grid button to re populate the grid.
Click the Select All button to select all of the vouchers displayed in the grid.
Click the Deselect All button to remove all of the checkmarks from the vouchers displayed in the grid.
Select one of the following display options:
Vendor Number Order
Voucher Order
Due Date Order
Vendor Name Order
Vendor #/ Invoice #
Click the Preview Pre-Check button to view the generated report of selected vouchers on screen.
Click the Print Pre-Check button to open a print dialog box. Select a printer and click Print.
Click the Next button to move on to Print Processing - Print Checks. Checks will be created for the selected vouchers.
Click the Back button to return to Check Processing - Create Checks.
Clicking the Close button will close the program with the following options:
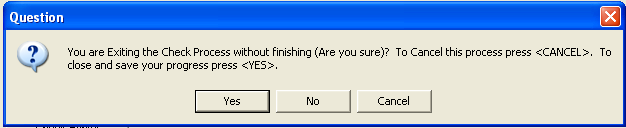
Click Yes to close and save your work. The check book will still be locked for any other check processing. This check processing job must be posted or canceled to unlock the checkbook.
Click No to return to the Check Processing Wizard and continue working
Click Cancel to close the wizard without saving your information
Vouchers will still be selected, but checks that may have been printed will not be saved and the check book will be unlocked. Any canceled checks will need to be printed again at a later time.
The check number shown here will be the number assigned to the first check that will be printed. Verify that the number is correct.
If the number is correct, proceed on to the next step
If the number is incorrect, change the number to the correct number and go on to the next step
If the program will not accept the changed check number, close and review the Last Check #1 in the check book master. See "How to Change Check/Electronic Numbers"
If a password is required to print checks with signatures, this field will be available for input. If no password is required, this field will not be displayed.
Enter the password.
If no password is entered into the field the system will display the following prompt message when the Print Checks button is pressed: "Signature password does not match - Print without Signature?"
Click "Yes" to print the checks without a signature.
Click "No" to return to the print checks screen which will allow you to input the password.
The Alignment Check button is only available when a dot matrix check format is selected. The button will send a zero check to the printer to check alignment.
Dot Matrix check formats are 001, 051, 052, 094, 095. and 034.
Verify that the printer shown to the right of the Check Printer button is the one you want to print the checks on.
If it is not the correct printer or if no printer is shown, click the Check Printer button to bring up the print dialog box. Available printers will be shown in the select printer window. Select a printer and click print. The dialog box will close and the selected printer will be shown to the right of the button.
Press the Print Checks button to print the checks.
If a signature password is required for the check book and no password has been entered, the following message will be displayed ""Signature password does not match - Print without Signature?"
Click "Yes" and the checks will be printed without a signature
Click "No" -the checks will not print. At this point you will be able to enter the password and click Print Checks or you may close the program without printing checks.
Verify that the checks have printed correctly.
The Back button may be pressed to return to Voucher Selection/Pre-Check Report until the checks have been printed when it will be disabled.
Click the Next button to move to Check Processing - Check Verification
Click the Close button to close out of the program. The following Question box will be displayed:
Click Yes to close and save your work. The check book will still be locked for any other check processing. This check processing job must be posted or canceled to unlock the checkbook.
If you go back into the program and recalculate, the information regarding the printed checks will be erased.
Click No to return to the Check Processing Wizard and continue working
Click Cancel to close the wizard without saving your information
Vouchers will still be selected, but checks that may have been printed will not be saved and the check book will be unlocked. Any canceled checks will need to be printed again at a later time.
The Check Verification view is used to clear and void checks. If the checks printed correctly, click Next to proceed to Print ACH Forms.
If you have printed the checks before entering this view, the check number, vendor name, amount of the check will be shown and they will be marked as "Printed".
Verify that all the checks are printed correctly by looking through the checks to make sure no checks were skipped or jammed
Click Next to go to Check Processing - Print ACH forms
If checks have not printed correctly use the clear/void options to reprint checks.
If you enter this view without printing the checks, the check numbers will be 0 and they will all be marked as "Set to Print"
If everything is marked as "Set to Print" press the "Back" button to return to the Print Checks view or "Close" to close out of the program without printing checks.
Use the Clear button to indicate that a check or checks did not print correctly and the check number is still available for use.
For example: Checks did not print at all or were sent to the wrong printer and printed on plain paper.
Place a check mark before each check line that needs cleared and reprinted, then press the Clear button.
In the window, the check number will be 0 and the lines that were cleared will be marked "Set to Print" for each line that was cleared.
Press the "Back" button to return to the Print Check view.
Make sure the starting check number is the correct
Verify the Check Printer and print the cleared checks.
Use the Void button to indicate that a check or checks did not print correctly and the check number cannot be used again.
For Example: Checks jammed during the print process and some checks were damaged.
Place a check mark before each check line that needs to be voided and reprinted, then press the Void button.
The check number(s) will be marked "Void"
A duplicate entry will be displayed with the check number as 0 and marked as "Set to Print"
Press the "Back" button to return to the Print Check view.
Make sure the starting check number is the correct
Verify the Check Printer and reprint the voided checks.
Note:
Voided and cleared checks may be reprinted all at one time, they do not have to be reprinted separately.
Use the Select All button to select/checkmark all checks to Clear or Void.
After using the Select All button use the Clear or Void button to finish the process
Use the Reset button to remove all the checkmarks from selected lines.
This option does not reset any checks that have already been cleared or voided.
Use the Process Range button with the blank fields above it to select or un select (check or un check) a range of check numbers
Enter a beginning check number in the first field
Enter an ending check number in the second field
Press the Process Range button
Use the Clear or Void button after the selection process is finished then go "Back" to reprint the checks
The Back will take you back to Check Processing - Print Checks
Click the Next button to move to Check Processing - Print ACH Forms
Click the Close button to close out of the program. The following Question box will be displayed:
Click Yes to close and save your work. The check book will still be locked for any other check processing. This check processing job must be posted or canceled to unlock the checkbook.
If you go back into the program and recalculate, the information regarding the printed checks will be erased.
Click No to return to the Check Processing Wizard and continue working
Click Cancel to close the wizard without saving your information
Vouchers will still be selected, but checks that may have been printed will not be saved and the check book will be unlocked. Any canceled checks will need to be printed again at a later time.
This section of check processing is for printing ACH stubs for vendors that have been setup for electronic payment. If there are no electronic payments during the check run, click Next to continue on to the next step.
If there are electronic payments for vendors during this check run, print out ACH forms for each vendor that will be paid electronically.
Verify that the ACH # is correct. If correct continue on to ACH Form Printer.
If the ACH/Electronic number is not correct, change it to the correct number or
Close the program and go to the Check Book Master and change the Electronic number. See How to Change Check/Electronic Numbers.
Verify that the printer shown to the right of the ACH Form Printer button is the one you want to print the ACH forms on.
If it is not the correct printer or if no printer is shown, click the ACH Form Printer button to bring up the print dialog box. Available printers will be shown in the print dialog window. Select a printer and click print. The dialog box will close and the selected printer will be shown to the right of the button.
Press the Print ACH Forms/Assign ACH Numbers button to begin printing ACH Forms.
The Back button will take you back to the Check Verification screen.
Click the Next button to move to the ACH Verification view.
Click the Close button to close out of the program. The following Question box will be displayed:
Click Yes to close and save your work. The check book will still be locked for any other check processing. This check processing job must be posted or canceled to unlock the checkbook.
If you go back into the program and recalculate, the information regarding the printed checks will be erased.
Click No to return to the Check Processing Wizard and continue working
Click Cancel to close the wizard without saving your information
Vouchers will still be selected, but checks and or ACH forms that may have been printed will not be saved and the check book will be unlocked. Any canceled checks/ACH deposit forms will need to be printed again at a later time.
The ACH verification view is used to clear and void ACH stubs. If ACH forms printed correctly click Next to continue.
If you have printed the ACH forms before entering this view, the ACH number, vendor name, amount of the check will be shown and they will be marked as "Printed".
Visually verify that all the ACH forms are printed correctly
Click Next to go to Post Checks
If ACH forms have not printed correctly use the clear/void options to reprint
If you enter this view without printing the ACH forms, the ACH numbers will be 0 and they will all be marked as "Set to Print"
If everything is marked as "Set to Print" press the "Back" button to return to the Print ACH/Forms view or "Close" to close out of the program without printing the ACH forms.
Use the Clear button to indicate that an ACH form did not print correctly and the ACH number is still available for use.
For example: Forms did not print at all or were sent to the wrong printer.
Place a check mark before each ACH line that needs cleared and reprinted, then press the Clear button.
The ACH number will be 0 and the lines that were cleared will be marked "Set to Print" for each line that was cleared.
Press the "Back" button to return to the Print ACH Forms view.
Make sure the starting ACH number is the correct
Verify the ACH Form Printer and print the cleared forms.
Use the Void button to indicate that an ACH Form did not print correctly and the form number cannot be used again.
For Example: Forms jammed during the print process and some forms were damaged.
Place a check mark before each check line that needs to be voided and reprinted, then press the Void button.
The form number(s) will be marked "Void"
A duplicate entry will be created with the form number as 0 and marked as "Set to Print"
Press the "Back" button to return to the Print ACH Forms view.
Make sure the starting form number is the correct
Verify the ACH Form Printer and reprint the voided forms.
Use the Select All button to select/checkmark all forms to Clear or Void.
After using the Select All button use the Clear or Void button to finish the process
Use the Reset button to remove all the checkmarks from selected lines.
This option does not reset any forms that have already been cleared or voided.
Use the Process Range button with the blank fields above it to select or un select (check or un check) a range of form numbers
Enter a beginning ACH form number in the first field
Enter an ending ACH form number in the second field
Press the Process Range button
Use the Clear or Void button after the selection process is finished then go "Back" to reprint the ACH forms
The Back button will take you back to Check Processing - Print ACH Forms.
Click the Next button to move to Check Processing - Post Checks.
Click the Close button to close out of the program. The following Question box will be displayed:
Click Yes to close and save your work. The check book will still be locked for any other check processing. This check processing job must be posted or canceled to unlock the checkbook.
If you go back into the program and recalculate, the information regarding the printed checks will be erased.
Click No to return to the Check Processing Wizard and continue working
Click Cancel to close the wizard without saving your information
Vouchers will still be selected, but checks that may have been printed will not be saved and the check book will be unlocked. Any canceled checks will need to be printed again at a later time.
This step must be completed in order for the printed checks to be sent to the Checkbook, Vendor History and the Accounts Payable Edit and Interface areas.
Once posting has started, the check book will be unlocked.
Press the Finish button to post the checks/forms that were printed and unlock the checkbook.
When the posting process has finished, the process complete info box will be displayed with the following question "Print Check Register"
Selecting "Yes" will open the Check Register dialog box. The Batch ID will be shown, click Preview to view the report and then print. Select Print to send the report directly to the printer.
Select "No" and the Check Processing program will close
Note:
It is recommended that the Check Register be printed out and kept for your records.