![]()
![]()
Go to Processes>>Tenant Transfer Wizard
This program will transfer a tenant to another unit. Suggested transactions for transferring rent, security deposit and tenant balances are shown.
See Also:
The tenant may be selected using the tenant number or last name fields.
Enter or select the Tenant Number or leave this field blank to select the tenant by last name.
When a tenant is selected by last name their tenant number will be filled in.
Enter or select a tenant by their Last Name. If the tenant number was used to select the tenant their last name will be shown.
The First Name of the selected tenant will be displayed.
The Middle initial or name of the selected tenant will be displayed.
Enter or select the transfer out date.
The transfer out date is the day before the date the tenant will be moving into the new unit.
Select the reason for the transfer from the drop down list.
Reason codes are setup and maintained in Move Out/Transfer Reason Code.
The description of the selected reason code will be displayed.
The program will default to the current date. The date may be changed.
The transaction date must be within the current period.
Current period information is updated/changed when the Close Month process is run.
See Also:
Steps for End of Month Processing
Enter new mailing address information if applicable. This area may be left blank.
Enter any additional mailing address information. This area may be left blank.
Enter the city, state and zip code information for a new mailing address. This area may be left blank.
Click the next button to continue with the transfer process and move to the Transaction page.
Click the close button to close the program without transferring the tenant.
The current transaction grid displays the tenant's current activity.
The tenant's current balance will be displayed.
This area displays security deposit balances from the tenant's file.
Security Deposit totals are displayed for the tenant.
The program will display suggested transactions to transfer balance and security deposit information to the tenant's new unit.
Prorated transactions are calculated based on auto bill information.
Additional Transactions may be entered at this time
For tenants with no balances to transfer the system will use an "other" type code with a description of "No Balance to Transfer" and a zero dollar amount.
Press the recalculate button to recalculate the Transfer to New Unit amount when additional transactions are entered.
The total dollar amount to be transferred to the new unit is displayed here.
Click the back button to return to the first page of the transfer wizard.
Note:
Adjusted transaction amounts may return to their default amounts when going back and forth between pages.
Click the next button to continue with the transfer. All transaction amounts should be verified before proceeding to the next page.
Click the close button to close the transfer wizard. No transactions or transfers are saved at this point.
Enter or select the area number the tenant is transferring to.
Displays the name of the selected area.
Enter or select the community number the tenant is transferring to.
Displays the name of the selected community.
Enter or select the unit number the tenant is transferring to.
Displays the address of the selected unit. There are two lines for the address.
This field does not allow user entry, press the Assign Tenant Suffix button to assign the next available two digit tenant suffix to the tenant and display it in this field.
The suffix should be correct - if it is not, call the Horizon Housing Help Desk (800) 889-3388.
The suffix is based on the next tenant to move into the unit. For example the previous tenant's suffix in that unit was 09. 10 should be the new tenant suffix for the unit.
Click the assign tenant suffix button to give the tenant the next tenant suffix available for that unit.
The program will enter the suffix into the Tenant Number field. If the number is not correct please call the Horizon Help Desk (800) 889-3388.
Enter or verify the utility allowance amount for the new unit.
Click the create tenant button to create the new tenant number.
When the tenant is created the auto bill setup grid for the new unit will be shown.
The auto bill information in the grid is based on the auto bill information from the tenant's old unit.
Edit or add auto bill information for the new unit as needed.
Do not prorate amounts for the grid
This column displays security deposit information.
Security deposits required amounts for the new unit will be displayed. The required amounts may be changed if the new unit has different security deposit amounts.
Click the back button to return to the "Transaction" page of the transfer wizard. Adjusted transaction amounts may return to their default amounts when going back and forth between pages.
Click the next button to continue to the "New Unit Transactions" page.
Click the close button to close the Tenant Transfer Wizard program.
Suggested transactions for the new unit are shown in the gird. Additional transactions may be added or the suggested transactions may be edited.
For tenants with no balances to transfer the system will use an "other" type code with a description of "No Balance to Transfer" and a zero dollar amount.
The total of the suggested transactions will be displayed. If a transaction is added or an amount is edited the ending balance will be affected.
This will be the balance in the new unit.
Verify information
Click the back button to return to the "New Unit Information Page". Adjusted transaction amounts may return to their default amounts when going back and forth between pages.
Click the next button to continue the transfer. A "Transfer Confirmation" box will be shown.
![]()
Click "Yes" to continue. The new unit and transactions are created.
![]()
A transfer complete information box will be shown. Click OK.
Click "No" to stay on the New Unit Transaction page.
Click the close button to close the program. Transactions and entry information will not be saved.
Check any forms or letters shown in the grid that should be printed.
Selected forms/letters may be printed for either the new or old unit
The Letter Date may be changed for the forms/letters
Click the Print Forms/Letter button to print the selected forms/letters
Select one of the following unit options to print the forms/letters for the page:
New Unit
Old Unit
The letter date is a merge field that may be used in forms or letters.
The date defaults to the current date.
The date may be changed.
Click the print form/letter button to open the Print dialog box as shown below:
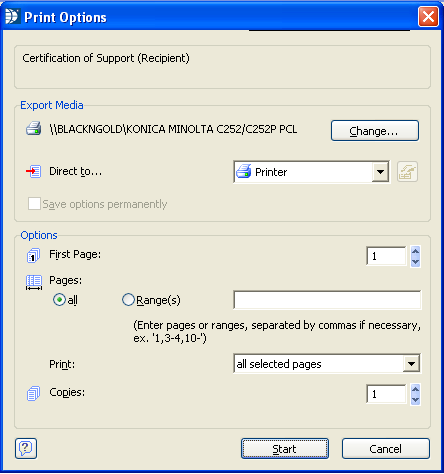
The change button may be accessed to select a different printer than the one shown.
Defaults to printer. Click the drop down arrow to select preview to view the selected forms or letters on screen before printing.
Click the start button to begin printing or previewing the selected pages.
****************
This button is displayed for 50058 properties.
Click the create/print 50058 button to create 50058 information to print and send to PIC.
Validations are made using HUD's 50058tool if it has been downloaded from HUD.
If an error is found, the information reported to be in error should be fixed in the new unit file and a new 50058 created and printed.
This button is displayed for 50059 properties.
Click the Create/Print 50059 button to generate a 50059.
Click Yes to print the 50059 or
Click No to close the information box without printing.
Click the finish button to complete the transfer.
A transfer complete information box will be displayed
![]()
Click "Yes" to print the register (recommended)
Click "No" to close the info box without printing the register (there is no way to reprint the register at a later time)
The transfer is now complete. It is recommended that the Tenant Information in the New and Old units be reviewed.