![]()
![]()
Revised: 11/15/2013
Go to Inquiries>>Work Order History
![]()
This program is used to view completed and voided work orders. Completed and voided work orders may also be reopened and printed from the Quick Links menu.
The following menu options are available from the quick link menu:
The current year will be displayed in this field when the program is opened. After a work order is selected the year the work order was created will be displayed in this field.
Enter or select a completed or voided work order to view.
The "type" that was selected when the work order was created will be displayed as one of the following:
Tenant - this option is only available if the Maintenance Management Module is used with housing authority software
Site
Fixed Asset
Dependant on the "type" selected when the work order was created the following information will be shown for each specific "type":
Tenant Information
Tenant Number
Tenant Name (Last Name, First and Middle Initial or Name)
Address
Site Information
Site Number
Address 1
Address 2
Fixed Asset Information
Item Number
Serial Number
Description 1
Current Location
The following information, entered when the work order was created will be displayed:
Notes
Category
Date Requested
Work Start Date
Date Completed
Date Assigned
Bill Date
Requested By
Assigned To
Permission to Enter
Smoke Detector Checked
Bill Tenant
GFI Checked
Show on Work Order Log
Housekeeping Checked
The following information will be displayed, if applicable:
Service Code
Description
Charge
The following information will be displayed, if applicable:
Employee Number
Last Name
First Name
Middle Name
Date
Regular Hours
Overtime Hours
Other
Bill (checkbox)
Bill $ (dollar amount)
If inventory information was entered when the work order was created, the following information may be displayed:
Line
Item Number
Description
Exp WH
Sell WH
Quantity
Cost
Extension
Bill (checkbox)
Serial Number
If a contractor was used in association with the work order the following information may be displayed:
Vendor #
Vendor Name
Start Date
End Date
Hours
Rate
Cost
Service Code
Bill (checkbox)
If any miscellaneous materials were purchased or used for the work order, the following information may be displayed:
Line
Item Number
Description
Quantity
Cost
Extension
Bill (checkbox)
If an asset was moved and associated with the work order, the following information may be displayed:
New Location
Location Code
Address 1
Address 2
Reason Tracking
Reason Code
Comment
Any comments entered for the work order will be displayed.
Work notes entered for the selected work order will be displayed and additional work notes may be added.
This page is used to attach files or scanned documents to the work order.
The document grid will show the following information for attached documents:
Date Added - displays the date the attachment was added.
Attachment - displays the name or description of the attachment.
Highlight an attachment and click the open button to view the document.
This button will open a "Select a file" dialog box. Browse to the folder/file that is to be added. Click the "Open" button or double click the file to attach.
This button will open the "Scanning Interface".
Enter a name for the document in Document Title.
Use the Scan button to begin scanning the document.
Save the document
Close when finished
Highlight an attachment and click the Edit Scan button to add additional pages or edit the scan.
Highlight an attachment and click the Delete button to remove it.
Highlight an attachment and click the Open button to view the document.
![]()
Files may be dragged and dropped onto the receiving icon to attach.
Work Order pictures may be viewed on this page.
Defaults to Page 1. If there are additional pages of pictures another page number may be selected.
Press this button to display pictures for the selected page.
Inspection pictures may be viewed on this page.
Defaults to Page 1. If there are additional pages of pictures another page number may be selected.
Press this button to display pictures for the selected page.
Go to Activities>>Work Order Entry>>Print Forms>>Work Order Form...
This menu option will bring up the Print dialog box. Select a printer and press the Print button.
Go to Activities>>Work Order Entry>>Print Forms>>Custom Forms and Letters
This program allows the user to select forms or letters that have been setup in the Merge Template to be printed with merged work order information.
Displays the Work Order Year and Work Order Number or the work order the program was selected from. A different Work Order may be selected using the Work Order Number field.
In the Horizon Work Order Letter Merge window/grid are descriptions of forms and letters that have been setup in the merge template. Click in a box to checkmark a letter/form to select it for printing.
Letter date field is a merge field that may be included in the selected form or letter. The merged field will print any date that is entered or selected here.
Click the print button to bring up the print options dialog box. The form may still be previewed if preview is selected in the Direct to... field.
Click the close button to close out of the Custom Form and Letters program.
This box may be checked to override some of the print/preview options set in the Merge Template for the form/letter.
For a first time print, leave this box unchecked.
This box may be checked to force a print dialog box to be displayed for the selected form/letter.
*******************
Go to Inquiries>>Work Order History>>Re-Open Work Order
This program will display the following message when clicked:
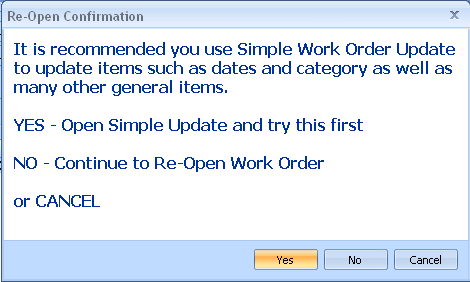
Clicking YES will open the selected work order in the Simple Work Order Update program. This is recommended for updating general information on the work order.
Clicking NO will re-open the work order. The work order may be updated in Work Order Entry.
Clicking the Cancel button will close the message box and the work order will not be re-opened.
The reopened work order will be found in the Work Order Entry program.
When a voided work order is reopened a confirmation box will be displayed asking if the user wants to Un-void the Work Order.
Click Yes to un-void the work order and reopen it. The work order will be found in the Work Order Entry program.
Click No to return to Work Order History
***********************
Go to Inquiries>>Work Order History>>Completed WO Report
This program will generate a detailed report for the selected Work Order.
The current Work Order year will be displayed.
The number will default to the work order number this program was selected from. Users may select a different work order number to generate a report on.
Click the "Preview" button to generate the report and view it on the monitor. The report may be printed from within the preview screen.
Click the Print button to open a print setup dialog box. Select a printer and click Print.
Press the Print with Setup button to open a print dialog box. Select a printer and press print.
Press the Email button to open an Utitiled Message dialog box with the form attached as a .pdf.
Click the down arrow to the right of Export and select PDF. This will open a Save dialog box. Select a folder and click Save.
Pressing the Clear Selections button will remove the Work Order Number.
The default printer information will be displayed at the bottom of the view.