![]()
![]()
Revised: 05/24/11
Go to Activities>>Process Manual Check
![]()
This program is used to calculate, print and/or post manual checks, voided checks or adjustments entered through the Manual Check Entry program.
Click the next button in step one to calculate the checks and move on to Step 2 of the manual payroll process.
Click the close button to close the program without processing manual checks.
In this area of the program, preview or print the edit lists for the manual checks that have been entered. Review the manual check information for errors. Close the Manual Check Processing program and make corrections if necessary.
Note: Manual check entries that display a check number on the edit list will not be printed out a physical check during the print check part of the program. The program also will not print a check for adjusting manual checks (a zero check amount).
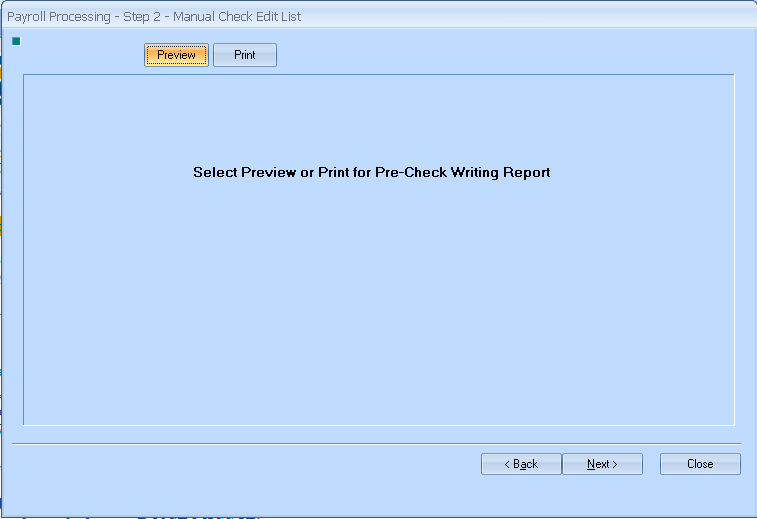
Press the Preview button to view the edit list on screen for manual checks that have been entered in Manual Check Entry. From within the preview area the report may be printed. For more preview options click here.
Press the Print button to bring up a print dialog box, select the printer for the report. Click the print button on the print dialog box to send the report to the selected printer.
Pressing the back button will take you back to the step 1 view.
Once you have reviewed the edit list, click next to move to step 3.
Click the close button to close the program.
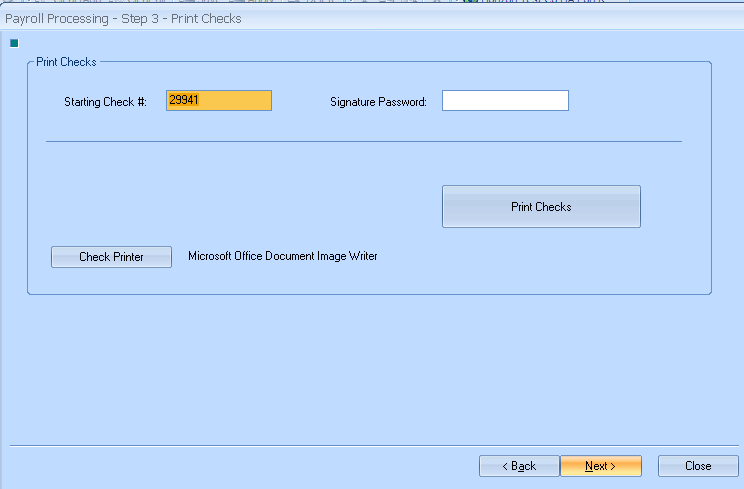
This field displays the default beginning check number for the payroll checks. Check your physical paper checks to verify that the number is correct. If the number is correct, verify that the correct check printer is selected to print the checks before attempting to print the checks.
If the starting check number is not correct, the starting check number may be increased to match the physical checks, but you will need to close out of the manual check processing program and correct the check numbers in the Check Book Master if the check number should need decreased.
See Also:
How to Change Check/Electronic Numbers
Enter the password in this field to allow signatures to print on the employee pay checks. If you are not printing signatures on the checks or if the signatures do not need a password, this field may be left blank. Tabbing out of this field takes you to the Print Checks button.
When Print Checks is pressed and a password is required but is not entered or is entered incorrectly a Signature Information box will be displayed with "Signature Password does not match - Print without signature?"
If you click "Yes" the checks will be printed without a signature.
If you click "No" the checks will not print and you will remain on this screen to reenter the password.
How to Add Check Signatures
The selected check printer is displayed to the right of this button. If there is no printer or if the wrong printer is shown, click the check printer button to bring up the print dialog box to select the appropriate printer to print the checks with.
Press this button to print the manual checks, if any. The program will not print a check for any manual check that was assigned a check number in the manual check entry program.
When Print Checks is pressed and a password is required but is not entered or is entered incorrectly a Signature Information box will be displayed with "Signature Password does not match - Print without signature?"
If you click "Yes" the checks will be printed without a signature.
If you click "No" the checks will not print and you will remain on this screen to reenter the password.
Pressing this button will take you back to Step 2 of the manual check process.
Click the next button to go to Step 4 of the manual check process.
Click this button to close the manual check processing program.
Check printing status may be reviewed in this step of the manual check process. If the checks have printed ok and you do not need to clear or void any check numbers, click the next button to move on to the next step.
If you are posting manual check adjusting entries, this screen will be blank. Click the next button to proceed.
Shown below is a sample of the screen:
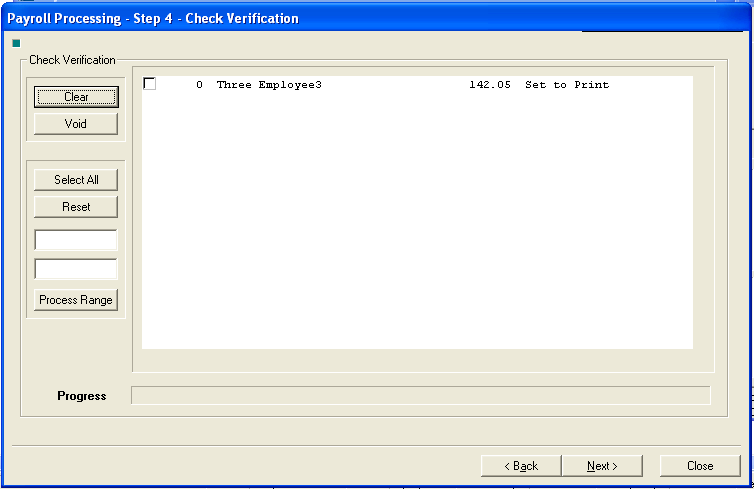
Use this button to clear checks numbers that have been checked. Clearing a check number indicates that the check number is still available for use. Check numbers that have been cleared will set the employee manual check status back to "Set to Print".
Use this button to void check numbers that have been checked. Voiding a check number indicates that the check number is used and is not available for printing. Voided check numbers will be shown in their number increment position and marked as "Void" The employee manual check status will be set back to "Set to Print".
Clicking this button will place check marks in all the boxes indicating that every line has been selected. Individual lines may be unselected by clicking in the checked box. When a line or lines have been selected the void or clear buttons may be used to process the selected lines.
Clicking the reset button will remove all check marks from the lines.
The two blank fields are used with the Process Range button for entering a group of check numbers to select a range of checks.
Use this button with the two blank fields to select or un-select a group of check numbers entered.
The grid or window displays information for the employee manual checks or manual check vouchers.
Employees manual vouchers that are showing "Set to Print" and have a zero check number need paper checks printed due to voided check numbers, cleared check numbers or the checks just have not been printed yet.
Employee vouchers that have an assigned check number and are marked "Printed" should have a check printed. (If the check information was sent to the wrong printer or if the printer jammed - the program will still think the check has been printed)
Check Numbers that have been voided will show a zero dollar amount and will have a status of "Void"
Boxes that are in front of the lines of information may be clicked on to place a check mark in the box indicating that the line has been selected. Lines may also be selected using the Select All button and the Process Range button. Once a line or lines are selected, they may be cleared or voided.
This area fills as it is completing the process of clearing or voiding check information to give an indication of how long the process may take.
Pressing this button will take you back to Step 3 of the payroll process to reprint any checks that have been voided or cleared.
Click the next button to go to Step 5 of the payroll check process when you have verified that the checks have been printed correctly.
Click this button to close the payroll processing program.
The manual check process is not complete until the information has been posted.
Shown below is a sample of the screen:

Click the back button on screen 5 to go back to Step 4.
Click this button to post the payroll information. Once the manual check information has posted a Process Complete info box will be displayed asking if the user wants to print the Check Register/Reports. It is recommended that users print out manual check posting reports at the time of posting.
Click "Yes" to bring up the payroll Check Register program.
Click the Preview button to review the reports on screen. The report may be printed from within the preview screen or the preview may be closed and the Print button may be used. Click here for more Preview information.
Click "No" to close the program without printing the payroll reports.
Click this button to close the manual check processing program without posting. When coming back into the program to finish the manual check process and post, the program will automatically recalculate and erase all of the printed check information for the manual checks you wish to post. (manual check entry information will still be available and you may process the payroll again to recreate the manual check information).