![]()
![]()
Revised: 11/29/2016
Go to Activities>>Manual Check Entry
![]()
The Manual Check Entry program can be used for the following:
Create a payroll check
Make adjustments to payroll information
Void payroll checks
Void and Reissue Payroll checks
Delete a manual check before it is posted
See Also:
If you have voided a payroll check or used the void and reissue option, information will be created during the process. The information may be viewed or edited for the transactions if needed.
Information may be entered directly into this program to create payroll adjustments or to create a payroll check.
The system will not allow more than one entry per employee to be saved. The following information box will be shown and users will not be able to continue until the original entry for an employee has been processed and posted.
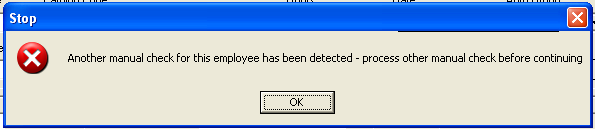
When attempting to void a check for an employee who already has a manual check entered...the user will receive a Stop informational box similar to the one shown below:

Transaction numbers are assigned by the system. To pull up a transaction number to edit, browse for the transaction number.
Before a manual check is posted, it may be deleted by pulling it back into the entry screen and with the cursor in the Transaction # field pressing the delete icon in the function menu.
Leave this field blank if you will be printing out the check using the Manual Check Processing program. During this process, a check number will be assigned to the manual check.
If you are creating an adjustment check that will not be printed out you may assign a check number here. The check number may be the next check number in sequence or you may use a check number between 11 and 99 which will not affect your regular check numbering tracking. Checks that have a check number assigned here in the Manual Check Entry screen will not print out during Manual Check Processing.
Enter or select a check date for the check. Check Dates are not assigned during Manual Check Processing and must have a date entered here.
The system will perform a check on payroll and time card dates. If the dates are not within three months of the current date a verification box will be shown. Verify the dates and click Yes to continue or No to adjust the date.
Enter or select an employee for the payroll adjustment/check.
When a valid employee has been selected, their name will be displayed in these fields.
Earnings information is necessary to input information for a payroll check to be generated; however, these fields may be left blank if entering information to adjust previous payroll deduction information.
Fill in the following earning fields similar to entering time card information. A line of earnings information must be entered through until it "drops" into the display area. If the information is not shown below it will not be saved.
Enter or select a time card date for the entry, if applicable.
Enter or select a valid earning code for this employee's payroll check, if applicable.
Enter hourly information if the earning code selected is an hourly code. If the earning code is a salary code, the hours may be zero. Hours may be entered for salary codes if "Using Salary Hours" is checked in Payroll Settings.
Enter an hourly or salary rate depending upon the earning code selected.
If the selected employee has an auto group code set in their employee master's Default Earnings Information the system will default to the auto group setting here. The default information may be accepted or the group code may be changed.
If your company uses an inter-fund code enter or select it here; otherwise, leave this field blank. If an invalid inter-fund code is entered an error message will be displayed.
Note: Depending upon payroll settings or if an Auto Group has been selected this field may not be available.
Enter or select a general ledger account for the earnings.
Note: If an Auto Group has been selected this field will not be available.
Enter or select a Department Code.
Note: Department codes are only available when Payroll Settings has Department Mode checked.
Lines of earning information that have been entered are shown in the display grid. Information will not be saved until it is shown in the "window" area. Information in the grid may be double clicked to bring it up into the entry/edit area for editing.
If the system is to calculate the net payroll amount based on deductions that have been coded as "mandatory" in the Deduction/Benefit Master click in the box to enter a check mark in this field.
If the system is to calculate net pay based on all applicable deductions leave this field unchecked.
Note:
The Mandatory Ded Only field is not available in all payroll modes.
Payroll hours, gross pay, deduction amounts and net pay are calculated and updated as the user moves through the manual check entry program and displayed in this area.
When this page of the program is entered, the program will calculate deduction amounts for all applicable deductions setup in the Employee Master for the selected employee unless the Mandatory Ded Only box has been checked. If the box has been checked only deduction amounts for those deductions coded as "mandatory" in the Deduction/Benefit Master will be shown in this area.
Calculated deduction amounts may be adjusted if needed.
This area may be used to adjust deduction gross or deduction amounts for an employee.
For example: If an employee moved and a portion of their previously deducted local tax needs moved to their new taxing code, it may be done in this area. (Enter a negative in the previous taxing entity for the gross and the deduction amounts and positive amounts into the new local tax code. There should not be any earning information on the first screen for this adjusting entry.)
If a deduction is not listed for the employee, make sure it is added for the employee in the Employee Master.
The deduction grid will display the following information based on deductions and benefits associated with the employee:
Deduction Code
Description
Deduction Gross
Employee Amount
Employer Amount
The program will calculate Social Security, Medicare, Federal and State information for the employee on earnings entered for this payroll check. If this is an adjustment entry and no earnings were entered all amounts will be zero.
The amounts shown on this page may be edited
The following information will be shown on this page:
Social Security Employee Gross
Social Security Employee Amount
Social Security Employer Gross
Social Security Employer Amount
Medicare Employee Gross
Medicare Employee Amount
Medicare Employer Gross
Medicare Employer Amount
Federal Withholding Employee Gross
Federal Withholding Employee Amount
State Withholding Employee Gross
State Withholding Employee Amount
Press this button to recalculate the standard deductions listed on this page.
Note: When you have entered or tabbed through all the fields an auto save will occur and the information on the screen will be cleared. You may, at any time, press the save button to save your work.
This menu option from Quick Link brings up the Void Check Selection window shown below:
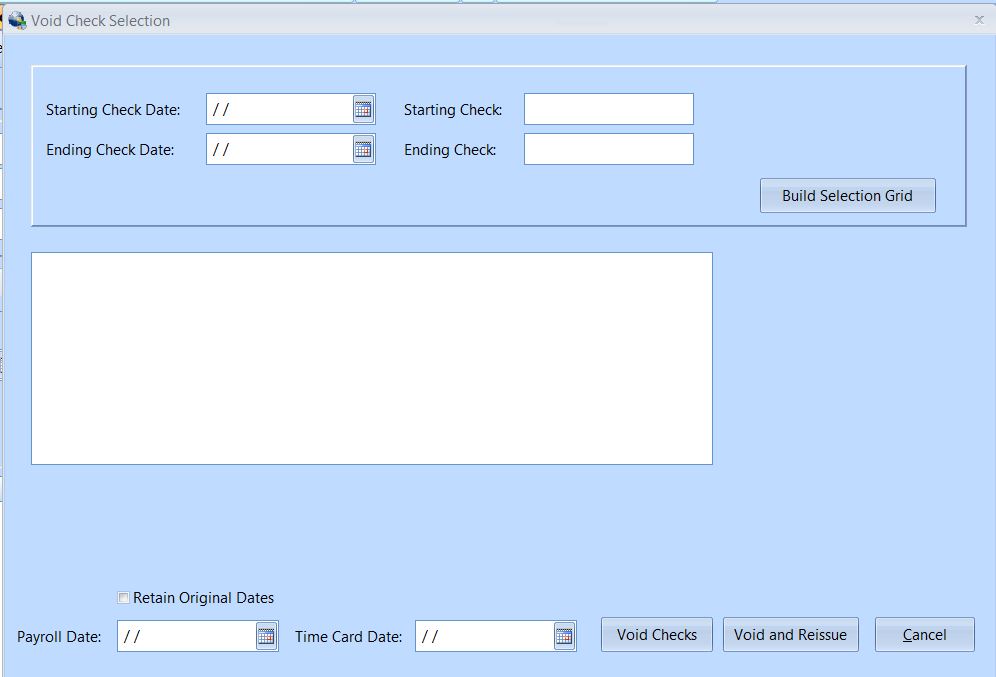
The four fields at the top of the view, Starting and Ending Check Date and Starting and Ending Check are used in building a display of checks in the window from which to select a check or checks to void. You do not have to fill in every field, but may enter data and then click the Build Selection Grid button to build the display of information.
Enter a starting check date to use as part of the selection process.
Enter an ending date to use as part of the selection process. An ending date should be entered. If both check date fields are blank the program may not be able to build information.
Enter a starting check number for use as part of the selection process.
Enter an ending check number for use as part of the selection process.
Click this button to generate a selection of checks in the grid. If you do not see the check or checks in the grid that you need, you may enter different data in the selection fields and click the Build Selection Grid button again.
When check information is shown in the grid, click in the box at the left side of the grid to "select" the check or checks to void. Checks that have been selected will have a check mark in the box. Clicking in a check marked box a second time will remove the check mark, which will un-select the check.
Click in this box to have the checks that will be voided, posted with their original payroll and time card dates. When this option is selected or checked the payroll date and time card date fields will be dimmed and unavailable for entry.
You can enter a payroll date of your choosing for the voided check(s).
Note: The Retain Original Date box must be unchecked for this date field to be available for entry.
You can enter a time card date of your choosing for the voided check(s).
Note: The Retain Original Date box must be unchecked for this date field to be available for entry.
Click this button to void the check or checks selected.
Note: The voided checks may be reviewed while in Manual Check Processing or in the Manual Check Entry program before posting.