![]()
![]()
Revised: 02/22/2016
Go to>>Maintain>> Employee Master
![]()
Employee information is entered and maintained in the Employee Master.
See Also:
How To Set an Employee's Direct Deposit to 2 Different Bank Accounts
How to Add or Modify a Deduction or Expense for All Employees
How to Attach a Document
Quick Link>
Filter Status - select Active, Leave of Absense, Terminated or All to restrict available Employees by their status.
Setting up a new employee.
Enter an employee number for the employee. The employee number must be a unique number, up to 6 digits in length. The system does not auto assign employee numbers.
To view the highest employee number already entered press the ![]() button while in the employee number field or browse to find the highest number.
button while in the employee number field or browse to find the highest number.
Browse for an existing employee.
Click on the square button to the right of the employee number field or press F4. In order for F4 to activate the employee browse feature, the employee number field must be the active field (it should be a different color than the other fields or have the cursor flashing in it).
Once the Employee Browse box is displayed you may scroll through the employees listed or you can begin typing the employee number, last name (change the search focus to either the number or last name by clicking the header) When you begin typing, a search box will appear displaying the information you are entering. You may also begin typing the employee's last name in the last name field and press F9 to find the name or the closest match.
Displays name information for an existing employee. For a new employee name information should be entered.
Status defaults to active for a new employee being entered. Available status codes are:
Active
Leave of Absence
Terminated
Note: Employees should never be deleted, but their status should be updated to reflect employment changes.
Select one of the following types:
Hourly
Salary
Pay type corresponds to the pay frequency processed for time cards and check processing. If an employee has a different pay frequency entered here than the pay frequency selected for processing they will not be paid.
Select one of the following pay frequencies:
BiWeekly
Monthly
Semi-Monthly
Weekly
Employees may be grouped by departments for general ledger distribution, printing of checks and reports. This field may be left blank if departments will not be used.
Department Codes are setup and maintained in Maintain>>Payroll Tables>>Department Code Master.
Department Mode is set in Settings>>Payroll Settings>>Parameters.
Employee general ledger information may be interfaced to more than one ledger/company or fund. IFC mode is setup in Settings>>Payroll Settings>>Parameters.
Inter-fund Codes are setup and maintained in Maintain>>Payroll Tables>>Interfund Code Master.
If using IFC codes, select an appropriate code for the employee's Home IFC Code. Otherwise, leave this field blank.
NOTE: Contact a Horizon representative if you are unsure about this feature.
Rate Class and Rate Level work with the Department Rate Tables found under Maintain>>Payroll Tables.
Department Mode must be activated for the rate class and rate level; otherwise, leave this field blank. Contact a Horizon representative if you are unsure about this feature.
With a rate class and level entered, the system will ignore any hourly rate entered in the default earning rate field and will instead pull payroll information from the rate and level table set up in Department Rate Tables. This feature only works on hourly pay rates and does not include salary rates.
Allows up to four lines of default earning code information for each employee. At least line 1 must be setup for each employee, unless the program is setup to use the department rate class and rate level option. A line of earnings may be setup and distributed on the distribution tab.
Please note:
The Main Hourly Code or salary code should be setup on line 1. During time card entry when an hourly code is entered, the system will use the main code rate from line 1 multiplied by the rate factor in the earning code to calculate the rate for all hourly codes that are not listed in the Default Earning Information area. Earning Codes that are listed in the Default Earning Information will pull the rates listed.
Enter all Earning Codes that the employee is paid at a different rate other than their Main Hourly Code rate.
Salaried employees for whom you are tracking entitlements and would like to reduce their salary by the amount of sick or vacation time entered in the time cards should have their Salary Code on the first line with hours entered. The Using Salary Hours field should be checked in Payroll Settings.
For an existing employee, the earning code information already entered will be displayed. This information may be edited.
For a new employee, enter or select a default earning code. Earning codes are setup and maintained in the Earnings Master.
For an existing employee, the rate information already entered will be displayed. This information may be edited.
For a new employee, enter a salary amount or Time Card Entry hourly rate for the employee. The rate may include up to 4 decimal places. If you are using the auto distribution feature for this employee you still need to enter a rate here.
This area may be left blank only if you are using the Department Rate Tables
For an existing employee the hours previously entered will be displayed. This information may be edited.
For a new employee, enter the standard number of hours worked for this employee. Hours may be entered with up to four decimal places. If you are using the auto distribution feature you still need to enter hours for the employee.
Zero hours should be entered for a salary type, unless Using Salary Hours is checked in Payroll Settings and entitlement hours are to be tracked. If Using Salary Hours is checked, then enter the number of hours the salary is based upon for the pay period.
The number of hours entered here are default hours which may be adjusted as needed when entering time card information without affecting the default hours entered here.
Stands for Time Card. Click in this box to insert a check mark indicating that the hourly or salary information entered on this line will be sent to the time card area when the automatic time card process is run. If this field is left blank the information on this line will not be sent to Time Card Entry for payroll processing.
Any employee whose time card is blank will not receive a pay; however, you may enter time card information manually.
Select one of the following cycles. A matching cycle must be selected during the Automatic Setup of Time Card process in order to pull the earning into the employee's time card. Earning information may be entered manually into a time card.
0 - Every Pay
1 - First Pay of Month
2 - Second Pay of Month
3 - Third Pay of Month
4 - Fourth Pay of Month
5 - First and Second Pay Only
6 - First thru Forth Pay only
L - Last Pay of Month
X - User Defined 1
Y - User Defined 2
Z - User Defined 3
<Undefined>
The system defaults to "No" for this field. This is the correct setting if you are not using the auto distribution feature for this line. If you are using the auto distribution feature, you should click the down arrow to the right of this field and select an auto distribution file from the drop down menu.
With auto distribution activated, the general ledger account number field will disappear.
Auto distribution choices are:
No
Undefined
Auto 1
Auto 2
Auto 3
Auto 4
If you choose auto 1 - 4 then you need to fill in the distribution information for the line on the distribution tab page for the employee.
Note: This field will not be shown if the Payroll Module has been set to Department Mode in the settings file or if an Auto 1-4 code has been selected. When the payroll module is in Department Mode this field will be replaced by the Department Code field.
For an existing employee, their general ledger information will be displayed for each line of earning information entered unless an auto 1 - 4 distribution code has been selected. General ledger information may be edited as needed.
For a new employee, enter the default general ledger account number for the earning code entered unless you have selected an Auto 1-4 code. The default ledger number may be changed, if needed, in Time Card Entry after the auto set up of time cards has been run.
If you have only purchased the payroll module, you still need a general ledger number to assign here. Create one general ledger account number and use it in all fields that require a ledger number.
If auto distribution has been used for an earning code line, then the general ledger account number is not needed here and the field will not be displayed. General ledger numbers for auto distribution will be assigned on tab 7-Distributions.
If you cannot access the correct company/ledger account numbers, you may need to set a home IFC code for your employee.
Note: This field is shown when the Payroll module has been set to Department Mode in Payroll Settings. When not in Department Mode this field is replaced by the General Ledger Account field.
Enter or select the appropriate Department Code for the employee earnings.
Note: The department code selected must have the general ledger account information set in the Department Distribution Master.
Address information entered here will print on the employee's check.
Displays or allows entry of the employee's address informations. Address 2 may be left blank if it is not needed.
Displays or allows entry of the city where the employee should receive their check.
Displays or allows entry of the state where the employee should receive their check.
Displays or allows entry of the 5 digit zip code information for the employee and the extended zip information if known.
Displays or allows entry of the employee's phone number. This field may be left blank.
Displays or allows entry of the employee's social security number. The social security number is needed for W2s.
Displays or allows entry of the employee's driver's license number. This field is not used by the system and may be left blank.
Displays or allows entry of the employee's union code, if available. This field is for information only, is not used by the system and may be left blank.
Displays or allows entry of the employee's service code, if applicable. This field is for information purposes only. It is not used by the system and may be left blank.
Displays or allows entry of the employee's location code, if applicable.
Displays or allows entry of the employee's badge number, if applicable. This field is for information purposes only. It is not used by the system and may be left blank.
Displays of allows entry of the employee's schedule code, if applicable. This field is for information purposes only. It is not used by the system and may be left blank.
Displays or allows entry of the employee's super code, if applicable. This field is for information purposes only. It is not used by the system and may be left blank.
Select a PSD Code for the employee.
Enter the date the selected PSD Code will become effective for the employee.
For an existing employee the information already entered will be displayed. The information may be adjusted as needed.
For an existing employee the federal information already entered will be displayed. The information may be adjusted as needed.
The system defaults to a checkmark in this box. You should only remove the checkmark if the employee is not liable for federal income tax.
Select the marital status of the employee as reported on their form W4 for the purpose of calculating their taxes from the following options:
Head of Household
Married
Single
Unkown
Widowed
Enter the number of dependants as reported on form W-4. This information is used to calculate federal taxes.
NOTE: Entering the number 99 in this field will disable the withholding of federal income tax for the employee. No income taxes will be withheld unless specified in the extra withholding area.
If the employee has requested, on their form W-4, for an extra percentage be withheld from their pay; enter that percentage here.
If no extra percentage was asked to be withheld; leave this field blank.
If the employee has requested on their form W-4 for an extra dollar amount be withheld from their pay; enter that amount here.
If no extra amount was asked to be withheld; leave this field blank.
The system defaults to a checkmark in this box. You should only remove the checkmark if the employee and employer are not liable for social security and medicare tax.
Place a checkmark in the HIRE Act box to indicate that this employee is eligible for the Hiring Incentives to Restore Employment Act. If this field is checked the employer will be exempt from the employer's 6.2 percent share of social security taxes on wages paid to the employee.
The Hire Act is only in effect from March 19, 2010 through December 31, 2010.
The system defaults to a checkmark in this box. You should only remove the checkmark if the employee is not liable for state income tax.
Enter the marital status of the employee as reported on their form W4 for the purpose of calculating their taxes.
Enter the number of dependants as reported on form W-4. This information is used to calculate state and federal taxes.
NOTE: Entering the number 99 in this field will disable the withholding of state income tax for the employee. No income taxes will be withheld unless specified in the extra withholding area.
Enter a two character state code. This state code must have a state tax table associated with it. If no state code is entered of if the code entered is not setup in the state tax table the state taxes will not be calculated or withheld for the employee.
For example: Enter or select PA
If the employee has requested an extra percentage for state tax to be withheld from their pay; enter that percentage here.
If no extra percentage was asked to be withheld; leave this field blank.
If the employee has requested an extra dollar amount for state tax be withheld from their pay; enter that amount here.
If no extra amount is to be withheld; leave this field blank.
Enter the employee's birth date for your records. This field may be left blank.
Enter the employee's date of hire. This information may be used with the entitlement variable setup.
If the next payroll run has time card ending dates prior to this employee's hire date, the employee will not be paid.
Enter the employee's anniversary date. This information may be used with the Entitlement Master.
Enter the date of the employee's last raise. This field may be left blank.
Enter the date of the employee's review. This field may be left blank.
Enter the employee's termination date. If there is a date in this field an error report will be generated if the Auto Ck field has a checkmark in it in the Payroll Settings file or if the Systems Check utility is run before payroll has been processed.
A one time deduction change may be entered for Federal Withholding. The deduction amount entered here will be used in the calculation of Federal Taxes during payroll processing. Once payroll has been posted, this area will be cleared.
If a deduction change to Federal Withholding is entered in the Time Card Entry program using the Quick Calculation feature, the change will be saved here until payroll has been posted.
A one time deduction change may be entered for State Withholding. The deduction amount entered here will be used in the calculation of State Taxes during payroll processing. Once payroll has been posted, this area will be cleared.
If a deduction change to State Withholding is entered in the Time Card Entry program using the Quick Calculation feature, the change will be saved here until payroll has been posted.
A one time deduction change may be entered for Social Security. The deduction amount entered here will be used in the calculation of Social Security during payroll processing. Once payroll has been posted, this area will be cleared.
If a deduction change to Social Security is entered in the Time Card Entry program using the Quick Calculation feature, the change will be saved here until payroll has been posted.
A one time deduction change may be entered for Medicare. The deduction amount entered here will be used in the calculation of Medicare during payroll processing. Once payroll has been posted, this area will be cleared.
If a deduction change to Medicare is entered in the Time Card Entry program using the Quick Calculation feature, the change will be saved here until payroll has been posted.
Leave these fields blank if 1099 R information will not be generated for the company/employee.
Select a distribution code from the drop down menu if applicable.
Place a check mark in this field if applicable.
Click in this field to place a check mark in this field, if applicable.
For an existing employee, information already entered will be displayed. For a new employee enter information on whom to contact during an emergency for the employee.
Enter the employee's emergency contact's name in this field.
Enter how the contact is related to the employee in this field.
Enter the address information for the emergency contact in the fields provided.
Enter the contact's city, state and zip code in the fields provided.
Enter a phone number for the emergency contact.
This information is needed if the employee will receive payment through direct deposit into his/her bank account. If the employee is to receive a printed check, this area may be left blank.
Select one of the following options for employee direct deposit.
Deductions Only - only deductions with ACH routing information will be sent to direct deposit.
Direct Deposit Activated - The employee's net pay and any deductions set up with ACH routing information will go to direct deposit
No Direct Deposit - The employee will receive a check - no direct deposit activated
Prenote Activated - a direct deposit entry will be created to test routing with a zero dollar amount
If the employee does not chose to have direct deposit or if your company does not offer direct deposit payment, leave the field blank, Undefined or select "No Direct Deposit" from the menu.
Enter the bank's routing number for the employee. This number will be the same for any employee using the same bank.
Enter the employee's account number where the pay will be deposited. This number is unique to the employee.
Select one of the following types:
Demand/Checking
Savings
Note: If an employee wishes to split their payroll direct deposit between savings and checking. Setup a deduction with an amount or percentage to be deposited into either savings or checking for the second portion of the split.
Checkmark the box if DocumentViewer.net will be used to distribute the employee's W2 information.
This field must have a checkmark in it in order for the employee to receive a pay. If this field is blank, it indicates that the employee should not receive a paycheck.
Enter the number of hours per day the employee works. This field will default to the hours per day set up in the payroll settings view. If the employee works a different amount of hours per day, change this number to the employee's correct number.
This number is used to automatically assign the number of hours paid for holiday pay and must be filled in for hourly workers. Salaried workers must have this information filled in if Using Salary Hours is checked in Payroll Settings.
The system will determine the number of benefit/credit weeks for each quarter and update this data entry field. This information will then be printed on the state unemployment tax report. This information can be changed by the operator if the system calculates an incorrect value. Since the system calculates this number when the Calculate Benefit Weeks program is run, this field may be left blank.
Enter the number of days per pay the employee works.
Enter the number of pay periods in a year.
For example: When paying weekly there are 52 pay periods in a year.
Enter a code to categorize the different workman's compensation amounts assigned to each employee. These codes are user defined, are not required by the system and may be left blank.
This information is used by the Horizon Maintenance Management Module when creating work orders. If you do not use Maintenance Management/Work Orders from Horizon, these fields may be left blank.
This information may also be entered in the Maintenance Management module using the Work Order Employee Master.
Check this box if the employee does maintenance that is tracked or billed from the Horizon Maintenance Management (Work Orders).
Enter the employee's normal work start time.
Enter the employee's normal work end time.
The start and end information is used in the work order system to calculate regular hours, overtime hours or other hours.
Enter the employee's regular hourly rate.
Enter the employee's overtime hourly rate.
Enter the employee's other hourly rate.
The hourly costs (Regular, overtime and other) are used to provide rate information in the Maintenance Program.
This area should be left blank if your company has not contracted with Horizon to use the Document Viewer Website to distribute payroll information for employees.
If your company is using the Document Viewer, create and enter login and password information here and update the website. After the login information has been created, employees can go to the website and view their payroll information. A physical pay stub does not need to be supplied to the employee.
Enter a unique Web Login code for the employee or press the Generate button (generation is recommended) to the right of this field to have the system create the login. Once a Web Login is created it should not be changed.
Press the Generate button to have the system create a unique Web Login code for the employee.
Enter a unique Password for the employee or press the Generate button to have the system create the password. Employees may change their password at any time on the Document Viewer Website; however, when the employee changes their password it is not updated here. If the user forgets their password, it can be updated at anytime in the Employee Master and sent to the Document Viewer Website.
Press the Generate button to create a unique password for this employee. The employee may change the password at any time on the website.
After the Web Login and Password have been entered, generated or both press the Send button to update the Document Viewer website. Employees will not be able to view their payroll information until the login and password information have been sent.
This view is used to enter or edit deduction information for an employee. Once a deduction has been entered through all of the fields it will drop down into the grid. A deduction will not be saved unless it is in the grid/window area.
Deduction information displayed in the grid may be edited in the grid, or you may double click on the deduction line in the grid to bring it into the entry area above to edit.Enter or select a deduction code. Deduction Codes and their default settings are setup and maintained in the Deduction/Benefit Master.
The description entered for the deduction code in the Deduction/Benefit Master will be displayed in this field. Changes to the description may be made in the Deduction/Benefit Master.
If a default cycle has been set for the deduction in the Deduction/Benefit Master, it will be displayed here. The cycle may be changed for this deduction. Blank or undefined can be a valid deduction cycle.
Deduction cycles correspond to codes set for each pay in the Pay Date Master.
Cycles may be added or removed manually during Payroll Processing.
When Process Only Mandatory Deductions is checked during payroll processing, only those deductions marked as mandatory deductions in the Deduction/Benefit Master will be withheld.
Possible cycle selections:
Blank or undefined - as long as there are blank cycles or not selected cycles during payroll processing a blank deduction cycle would be processed every pay.
0 - Every Pay - the deduction will be withheld for every pay unless the "Process Only Mandatory Deductions" option is selected for the pay.
1 - First Pay of the Month - for biweekly and weekly pay frequencies the deduction will be withheld on the first pay of the month. For monthly pay frequencies this selection would be the same as every pay.
2 - Second Pay of Month - Deductions will only be withheld on the second pay of every month.
3 - Third Pay of Month - Deductions will only be withheld on the third pay of every month.
4 - Fourth Pay of Month - A deduction will only be withheld on the fourth pay of the month. Use this option only for weekly pay schedules.
5 - First and Second Pay Only - Deductions will be withheld on the first and second pay only. For semi-monthly payrolls this would be the same as every pay.
6 - First through Fourth Pay Only - deductions will be withheld on every pay, except when there is a fifth pay of the month.
L - Last Pay of Month - Deductions will only be withheld on the last pay of the month.
X - User Defined 1 - Users may assign the code in the Pay Date Master to the pay the deduction is to be withheld or select it when a payroll is processed. If the code is to represent a stop cycle (the deduction is to no longer be taken out) it should not be used in the Pay Date Master or during payroll processing.
Y - User Defined 2 - Users may assign the code in the Pay Date Master to the pay the deduction is to be withheld or select it when a payroll is processed. If the code is to represent a stop cycle (the deduction is to no longer be taken out) it should not be used in the Pay Date Master or during payroll processing.
Z - User Defined 3 - Users may assign the code in the Pay Date Master to the pay the deduction is to be withheld or select it when a payroll is processed. If the code is to represent a stop cycle (the deduction is to no longer be taken out) it should not be used in the Pay Date Master or during payroll processing.
User Defined codes may be used for one time only deductions or to stop a deduction from processing during payroll.
Enter a valid DGR code.
To setup or edit a deduction gross reduction code go to Maintain>>Payroll Tables>>Deduction Gross Reduction Master.
A deduction usually calculates amounts based on an employee's gross pay. When a deduction is tagged with a DGR code; it will not calculate the deduction amount on any earnings associated with the DGR code. It will only calculate a deduction amount based on earnings not listed under the DGR code.
If defaults were set in the Deduction/Benefit Master, this field will default to those presets defaults.
If defaults were not set, or to make a change to the default, enter or select one of the following options:
B - Non Taxable (Fed/SocSec/Medicare) - Amount will be deducted from gross pay prior to the calculation of federal income, social security and medicare taxes being withheld.
F - Non Taxable (Federal) - Amount will be deducted from gross pay prior to the calculation of federal income taxes being withheld.
S - Non Taxable (SocSec/Medicare) - Amount will be deducted from gross pay prior to the calculation of social security or medicare taxes being withheld.
Y - Taxable (Fed/SocSec/Medicare) - Amount will be deducted from gross pay after federal, social security and medicare taxes are withheld.
If defaults were set in the Deduction/Benefit Master, the field will default to those presets.
If no defaults were set, or to make a change, select one of the following options:
B - Non Taxable (State/Local) - The deduction will be withheld from gross pay before the calculation of state and local taxes.
L - Non Taxable (Local) - The deduction will be withheld from gross pay prior to calculating local taxes.
S - Non Taxable (State) - The deduction will be withheld from gross pay prior to calculating State taxes.
Y - Taxable (State and Local) - The amount will be deducted from gross pay after state and local taxes are calculated for withholding.
If a deduction is classified as employer only in the Deduction/Benefit Master, the employee deduction fields will not allow any entry of data. If the deduction is classified as employee or employee/employer these fields will allow entry.
If a default amount was set in the Deduction/Benefit Master, the field will default to the amount. The default amount may be changed here for this employee.
Enter in an amount for either a dollar figure, percent, based on hours or net based percent or accept the default amount.
Enter or select a type from one of the following or use the default:
$ - Dollar Amount - The amount will be withheld as a dollar amount.
% - Percent Amount - The amount will be calculated and withheld as a percentage.
H - Based on Hours - The amount will be withheld as a dollar amount, based on the number of hours worked.
N - Net Based on Percent - The amount will be calculated on the net pay amount for withholding based on the percentage entered.
For a deduction with no limit on the amount you must enter 99999.99 in this field. For a deduction with a cut off amount, enter it here. A deduction will not be taken out with a maximum of 0.00.
For example
A deduction has a $52.00 maximum entered. Once the deduction has reached the amount of $52.00 in the YTD Employee column shown in the grid, the system will no longer take the deduction out of the employee's pay.
Note
When Payroll End of Year Process is run the YTD Employee amounts will be reset to zero unless Retain Max at Year End is checked in the Deduction/Benefit Master under Employee.
If a deduction is classified as employee only in the Deduction/Benefit Master, the employer expense fields will not allow any entry of data. If the deduction is classified as employer or employee/employer these fields will allow entry.
If a default amount was set in the Deduction/Benefit Master, the field will default to the preset amount.
Enter in an amount for either a dollar figure, percent, based on hours or net based percent or accept the default amount.
Enter or select a type from one of the following or accept the default:
$ - Dollar Amount - The amount will be withheld as a dollar amount.
% - Percent Amount - The amount will be withheld as a percentage.
H - Based on Hours - The amount will be withheld as a dollar amount, based on the number of hours worked.
For a deduction with no limit on amount enter 99999.99 in this field. For a deduction with a cut off amount, enter it here. A deduction will not be taken out with a maximum of 0.00.
For example
A deduction has a $52.00 maximum entered. Once the employer portion has reached the amount of $52.00 in the YTD Employer column in the grid, it will no longer calculate the deduction amount.
Note
When the Payroll End of Year Process is run the YTD Employer amounts will be reset to zero unless Retain Max at Year End is checked in the Deduction/Benefit Master under Employer.
The advanced button activates the following view and allows users to set a start and end date for a deduction or to mark the deduction as a one time only deduction change or to mark a deduction as inactive.
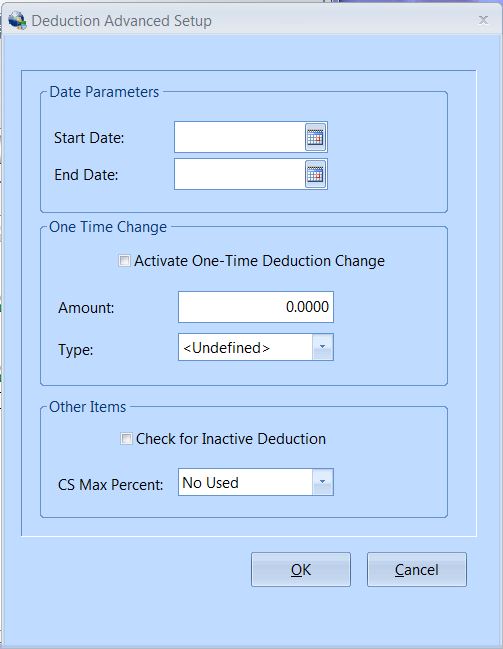
A deduction must be saved to the grid before accessing the Advanced and ACH/EFT Setup buttons.
Leave the start and ending dates blank if the deduction will be active immediately and has no known end date.
Start Date - if a start date is entered, the deduction will not function before this date.
End Date - if an end date is entered, the deduction will not function after this date.
When checked the deduction will be taken out for the amounts entered one time only.
If a change is made to a deduction in the Time Card Entry, Quick Calculation feature, this field will be checked until payroll is posted.
Enter a dollar or percentage amount.
If a change is made to a deduction in the Time Card Entry, Quick Calculation feature, the change will be recorded here until payroll is posted.
Enter or select a type from one of the following:
Dollar Amount - The amount will be withheld as a dollar amount.
Percent Amount - The amount will be withheld as a percentage.
Based on Hours - The amount will be withheld as a dollar amount, based on the number of hours worked.
Net Based Percent - The amount will be withheld at the percentage entered calculated on the net pay amount.
Placing a check mark in this field will trigger the program to search for an inactive deduction with the same deduction code for the employee.
Click the ![]() button to accept the Advanced entries or click the
button to accept the Advanced entries or click the ![]() button to cancel the Advanced entries.
button to cancel the Advanced entries.
Continue to enter or tab through till the deduction is dropped into the grid to save it.
Select the proper Child Support Maximum Percent based on the support order.
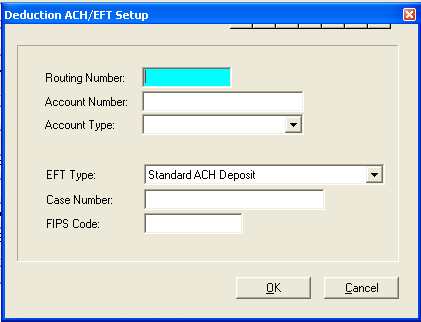
The deduction should be saved to the grid and then brought back up before clicking the ACH/EFT button.
The ACH/EFT Setup button activates the following view to enter routing and bank information.
**************************************
Enter the routing number for the bank where the ACH deduction will be sent.
Enter the employee's bank account number where the ACH transaction will be sent.
Select the account type for the receiving ACH transaction as one of the following:
Demand/Checking
Savings
Select one of the following as the electronic fund type:
Standard ACH Deposit
Child Support CCD Transaction
Enter the case number for the electronic funds transfer if one has been assigned. Otherwise, leave this field blank.
Enter the FIPS code, otherwise leave this field blank.
Click the ![]() button to accept the ACH/EFT Setup or click the
button to accept the ACH/EFT Setup or click the ![]() button to cancel the ACH/EFT entries.
button to cancel the ACH/EFT entries.
Continue to enter or tab through until the deduction is dropped into the grid to save it.
The auto 1, 2, 3 or 4 must match an auto distribution option selected on the Employee's Main tab under Default Earning Information; Auto Distribution. If Auto Distribution is set to no for all default earning lines on the main tab skip this tab page.
In the top field select the auto 1, auto 2, auto 3 or auto 4 to match the Default Earning auto distribution code assigned on the main tab.
You may have up to four auto distribution codes setup for each employee for the four lines on the Employee Master main tab under Default Earning Information.
Enter an interfund code or click on the heading bar ![]() to display a browse box. From the browse listing select the appropriate interfund code and click ok.
to display a browse box. From the browse listing select the appropriate interfund code and click ok.
If you do not use interfund codes for payroll, leave this field blank.
Enter a General Ledger Account Number or click on the header bar ![]() to select the appropriate account number.
to select the appropriate account number.
This field will fill in with the description of the GL Account Number selected in the previous field.
Enter the percentage for distribution purposes for each line/general ledger account number. The total of all lines entered must equal 100 percent. The total is shown at the bottom right of the view.
For Example:
The employee's wages are divided between five general ledger numbers. There would be five lines, one for each general ledger number. Each of the lines would have a percentage of 20 assigned to it, equaling 100%.
The field shown at the bottom right of the view shows the percent total. The amount shown here should be 100 after the distribution information has been entered in the grid.
Entitlement codes are used to give and track, personal, sick and vacation days in the program. If this feature is not used, leave this page blank.
Entitlement codes are setup or edited in Maintain>>Payroll Tables>>Entitlement Master.
Other than to assign an entitlement code, the information contained on this page is updated by the system.
See Also
Enter or select the appropriate entitlement code. You may track up to 8 different entitlements per employee. Accumulation Codes are setup and maintained in the Entitlement Master.
These areas are for display only; data cannot be changed within the grayed out fields. If the information displayed here needs adjusting, it is done through a Manual Check or through Manual Entitlement Entry.
|
Description |
This area shows the description of the entitlement code selected. |
|
Prior Accumulation |
This area shows days that were accumulated in prior periods. If roll overs were not allowed zeros would be shown here. |
|
Current Accumulation |
This area displays days that have been accumulated during the current period. |
|
Used YTD: |
Displays the number of days the employee has taken this year. |
|
Available: |
Displays the number of days the employee has remaining. |
This area is used to enter notes by date for the employee.
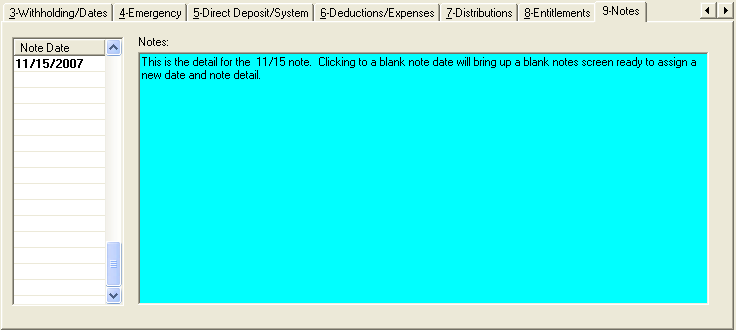
On a blank note date, enter a date for a new note. Or click on an existing date to view or edit the note detail for that date.
Use the scroll bar or the arrow keys to move through the dates.
Enter notes for a new date or edit notes for a note previously entered under an older date.
On the Function Bar at the top of the tab page are the following program features:
Add - opens Document Additions (follow the link for complete information)
Scan
First Page, Previous, Next and Last Page arrows.
Zoom with Enable Area Zoom, Enable Image Scrolling
Delete
A Category may be selected as a filter.
A Start and End Date may be entered as a filter.
When a document is attached the following information will be displayed:
Date
Title
Category
Comments