![]()
![]()
Revised: 11/20/2012
Go to Maintain>>Template Master
The Template Master is the first step in setting up a financial statement. In this program you may setup and maintain the account number information, wording and some of the formatting information for the statement.
See Also:
For a new template, enter an alpha numeric code for the template you will be designing. For an existing template enter or select the code for the template you wish to view or edit.
This code is used in the financial statement master.
Enter a description for a new template, or edit an existing description.
Select one of the following types for the template master.
Balance Sheet
Profit-Loss
Select one of the following:
Standard - account segments will print out in the order as defined in Settings>>General Ledger Settings>>Account Control
FS Grouping 1
FS Grouping 2
FS Grouping 3
FS Grouping 4
FS Grouping 5
FDS Reporting
Any additional User Defined Ordering that has been setup in the Settings>>General Ledger Settings>>User Defined Ordering.
For more information on FS Grouping, click here.
See Also:
Place a check mark in the square to have account numbers print on the statement
If you do not want account numbers to print on the statement, leave the square unchecked.
Place a check mark in the square to have account number descriptions print on the statement.
If you do not want the account number descriptions to print on the statement, leave the square unchecked.
Enter a number for the column width if you have a check mark in to print the information. To get an approximate width to try, multiply 20 times the number of characters in the account number or the account description.
For example if your account number has 15 characters, multiplied by 20 would equal 300. The width can be adjusted up or down as needed. The font and font size will also affect the width needed.
Place a checkmark in an account segment to have it summarized. If you do not want to summarize any of the account information, do not place a checkmark in these fields.
Place a checkmark in all account segments that should be printed on the financial statement.
Select a function from the browse window or type it in. Click to see all the function codes.
Enter a company ID if the general ledger information needs to be pulled from a different company other than the company the financial statement is created in.
For example:
You are setting up a template in company C001 and need to pull information for company C002. Enter C002 in the Comp field for each line that needs to be pulled from that company.
If the function code is AA, AP, ARA or ARP enter or select an account number or FS Grouping code.
If the function code is AA, ARA or ARP enter or select an account number to print that account number or begin a range
If the function code is AP and the Account Mode is a FS Grouping #, then do not enter an ending account number.
If the function code is AP and the Account Mode is standard enter an ending account number for a range
Enter a description for Header functions and functions that total or if the Account Mode is an FS Grouping #. The descriptions will be shown on the financial statement.
When using a Standard Account Mode and entering an account number range the descriptions will pull from the account number(s).
The OS (offset) column is used for balance sheets. Enter the appropriate offset or column that the information should print to. A "1" prints the information in the first column a "2" prints the information in the second column and a "3" prints in the third column.
Line Feed.
Enter the amount of lines to the next printed line. 1 prints the next entry on the next line, 2 skips one line before it prints, and so forth.
Click this button to insert the number of lines specified in the # field to the right of the button. Click in the report where you want the lines inserted before you click the button.
Move lines up or down one line in the report using these buttons. Click in the grid before you click the move button.
Font Setup
Select the font information for the Header, Subtotal or Detail sections of the financial statement. They may all be the same font information or they may be different.
Click on the ![]() button for each section to bring up the font dialog box and select the Type Face. Enter the size and weight for the font. Place a check mark for Italics/Strikeover or Underline.
button for each section to bring up the font dialog box and select the Type Face. Enter the size and weight for the font. Place a check mark for Italics/Strikeover or Underline.
To clear all special formatting click on the ![]() button for each section that is to be cleared.
button for each section that is to be cleared.
****************************
After selecting an existing template, press the Duplicate icon on the Quick Links bar to open the Copy Template program.
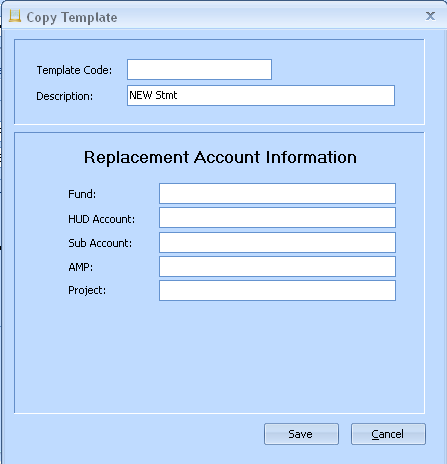
Enter a new Template Code
Enter a new Description for the Template. The description for the copied template will be displayed and may be kept if applicable.
Enter Replacement Account Information in the appropriate segments
Press Save to copy the template.