![]()
![]()
Revised: 11/19/2015
Go to Activities>>Voucher Entry>>Voucher Entry
Note: When in a Contract mode pressing the upper portion of Voucher Entry will bring up the AP Voucher Entry program or the down arrow may be used to select Voucher Entry from the list.
This program is used to create Accounts Payable Vouchers for payment, recording payments already made, electronic payments, voiding checks and cancelling vouchers.
See Also:
Print Forms
Special Vouchers
History - Available after a vendor is selected.
When entering information to create a new voucher, leave this field blank, the system will assign a voucher number based on the last voucher number shown in the Accounts Payable settings file.
Enter or select an existing voucher number to edit or review the information.
Only vouchers that have not been posted are available for review or deletion.
Vouchers may be selected and deleted in this view. While keeping the cursor in the voucher number click the Delete button. Click Yes to delete the record or No to cancel the deletion.
There are several types of transaction types available:
Regular AP - This transaction type may be set as the default in Accounts Payable Settings. A voucher will be created and once posted, will be in the check processing, voucher selection area for payment. After selecting this transaction type, the tab or enter button will take you to the P.O. Number field. See also: "How to Enter a Regular AP Voucher"
Non Accounts Payable - This transaction type may be set as the default in Accounts Payable Settings and is used to record electronic payments or to create a voucher and print a check before posting. After selecting this transaction type, the tab or enter button will take you to the P.O. Number field. After a check has been printed, users will not be allowed to change any fields on the main tab. See also: "How to Enter Non Accounts Payable Vouchers"
Simple Void - Creates a void with a zero amount to record an unused check as voided. After selecting this transaction type, the tab or enter button will take you to the P.O. Number field. See also: "How to Enter a Simple Void"
This field is used in conjunction with the Horizon Materials Management module. If you are creating an AP voucher from a purchase order, select the purchase order number and press tab, otherwise leave this field blank.
Purchase order numbers may also be typed in for a voucher that is entered or the Recv # field may be used to select a P.O.
See also:
Purchase Order Numbers are created and maintained in the Horizon Materials Management module for use in the Financials module.
Note: The Receiver Auto-Close Threshold set in Accounts Payable Settings will control whether a purchase order with a balance remaining will be closed after the voucher is posted. When the voucher amount is less than the amount remaining on the purchase order and the PO balance is equal to or more than the threshold amount, the purchase order will remain open for future vouchers to be applied. If the receiver threshold in Accounts Payable Settings is zero, the purchase order will be closed whether there is a balance remaining or not.
Verify that the correct receiving number is shown for the purchase order number selected or use the Recv # field to select a P.O. If a purchase order number will not be selected, leave this field blank.
When a PO Number is selected, its receiving number will be shown here.
The browse connection on this field opens up the same purchase order browse as the PO Number so a purchase order may be selected using this field instead of the PO number field.
Purchase Orders may be received in several shipments and a receiving number is generated in the order the merchandise is received. Therefore, several AP vouchers may be created for one purchase order with different receiving numbers.
Tab out of the Recv# field to open the Purchase Order Verification window.
Enter or select a vendor number for the AP voucher if not already selected. If you select the vendor by vendor name, the vendor number will be filled in from the vendor's file.
If a vendor number was selected, then the vendor name will be filled in. The vendor name field may also be used to enter or select vendor information for the AP voucher.
Once a Vendor has been selected, the address information that has been entered for the selected vendor in the Vendor Master will be displayed.
Default terms for the selected vendor may be shown in this field. Default terms may be changed when entering an AP voucher for this voucher only. Term Codes are associated with a vendor in the Vendor Master but are setup and maintained in the Terms Code Master.
The default pay group for the vendor will be shown in this field if it has been setup, otherwise, the system will default to the pay group that is setup in the Accounts Payable Settings file. The description for the selected pay group code will be displayed in the field to the right of the pay group code.
The default pay group may be changed for this voucher.
This is a required field.
The small rectangle to the right of the pay group description field displays the source code for the voucher after it is saved. When a voucher is entered in the Financial AP Voucher Entry program and saved, the source will be shown as "AP". When a voucher originates from another module, the source will be shown as coming from that module.
For Example: If a tenant refund is entered in the Tenant Management Adjustment Entry program, the voucher that is created and sent to the Financial module will show a source of "TA" for tenant accounting.
Enter the invoice number from the vendor's invoice or statement. This is not a required field and may be left blank.
Enter the invoice date from the vendor's invoice/statement or tab to accept the default date. This is a required field.
The invoice date may be setup to retain the date entered from the preceding voucher during the session. To setup this option, go to Settings>>Accounts Payable Settings and check the box labeled "Retain Invoice/Tran Dates".
Enter a G/L date or tab to accept the default date. This is the date the voucher information will be recorded in the general ledger after the Accounts Payable Interface has been pulled. This is a required field.
The G/L Date may be setup to retain the date entered from the preceding voucher during the session. To setup this option, go to Settings>>Accounts Payable Settings and check the box labeled "Retain Invoice/Tran Dates".
When an invoice needs to be accrued, this date field can perform that function for you. The general ledger and accounts payable entries are interfaced (recorded) according to this date.
A default due date may be shown here or you may enter or select a different due date.
The due date may be used in some voucher selection processes.
Due dates may be automatically calculated based on the terms selected.
Enter the dollar amount for this transaction. Negative number are allowed, if applicable.
Enter a description for the invoice. This description will be shown in the general ledger for any transaction referencing this voucher.
These fields will remain dimmed and will be skipped over unless the selected Terms code is setup for discounts. If the fields are undimmed, the default discount information may be accepted or edited.
Accept the default entry or enter the amount of the invoice that would not be subject to the discount. This field may be left blank.
For example:
Labor charges on the voucher may not be subject to a discount.
Based on the terms selected, the amount of discount may be displayed. The default amount may be removed or adjusted. This field may be left blank.
The amount entered here will be deducted from the Invoice Amount if the invoice is paid before the Disc Date.
Accept the default date or enter another date. If the invoice is paid before this date, the Disc Amt will be deducted from the invoice amount when the check is processed. This field may be left blank.
Click in this field to place a check mark, indicating that this voucher/invoice is to be paid separately from any other voucher for this vendor that is selected for payment at the time the checks are processed.
If this field is left unchecked, this voucher will be combined with other vouchers for this vendor that have been selected for payment. One check will be printed for the vouchers.
When a check mark is entered in the Auto Select box, the voucher will automatically be selected for payment in the Voucher Selection Grid and in the Check Processing Wizard.
This section of the voucher will remain dimmed and unavailable for entry unless the transaction type supports its use. Check # and Check Date does not default to any value if you are using Contract Mode 2
Check this field if this voucher is to record an electronic payment. If this field is checked the Check # that is displayed will be based upon the Last Electronic number that is in the Check Book Master.
The system will display the default check number based on the last check number used in the Check Book Master. If the check number is not correct, review the check book that is associated with the pay group. The check number may be changed/updated in the Check Book Master if necessary.
The Check Date will default to the same date as the due date. The default check date may be changed if necessary.
The distribution area is used to assign general ledger account numbers to the expense transaction. Distribution lines will not be saved until the line has dropped down into the window below.
Distribution may also be entered from an excel spreadsheet using Drag n Drop. See: How to Work with Drag N Drop Accounts Payable Entries
Displays the invoice amount entered from the previous page.
Shows the total distribution amount total as they are entered.
Shows the amount left to be distributed. This amount should be zero before you close out of the voucher.
Indicates the line you are in the process of entering and will automatically assign the next line number to each entry. The line number may be changed to bring up a previously entered line.
Depending on which AP Mode you are in, you may see a field for a paygroup code, an IFC Code, both or none.
For the field(s) that are shown, select the proper paygroup / IFC code for the transaction you are entering.
When tabbing, entering or clicking into this field the system will default to the general ledger account number setup as the default for the selected vendor. This field and the general ledger default account number may be left blank to use the auto complete feature in the Account Description field.
If you have tabbed or entered into this field and tab or enter to leave it, the Account Number Browse will open with the account number highlighted. Enter (return key) to accept the highlighted account number or select a different account number.
If you are using the mouse to navigate through the transaction, the browse feature will not automatically open when leaving the Account Number field. If a different account number is needed for the transaction, other than the default shown, click on the browse button on the right end of the field or press F4 to activate the Account Number Browse.
When an account number is selected that has an effective date range setup, the G/L date entered for the voucher must fall within the allowable range or an "Account Number Entered not Valid for the Date Entered" error message will be displayed.
If a default GL account number has not been setup for the vendor in the Vendor Master, no account number will be displayed. Enter or select the proper account number for the transaction or tab to the Account Description field to use the auto complete feature.
The GL Account Master description for the general ledger account number selected will be displayed here. If the Account Number is blank, the auto completion feature may be used to select an account description. When the account description is selected, the account number will fill in.
Microsoft Excel files may be dragged and dropped onto the view to automatically create distribution lines from the information in the file.
**In MS Excel start a new Worksheet if you do not already have one. In Row 1, enter the field headings to match the fields on the distribution page:
For example:
IFC, account, reference, amount. Headings can be in any order. The field "reference" is not mandatory. If your distribution page does not include IFC Codes you do not need to add an IFC heading. Account numbers can be entered as a straight number 1014502000002 or with the separators used in the account structure. For example: 1.01.402.00.002
If your distribution includes consumption account numbers, the import file will need Tracking1 - Tracking4 columns.
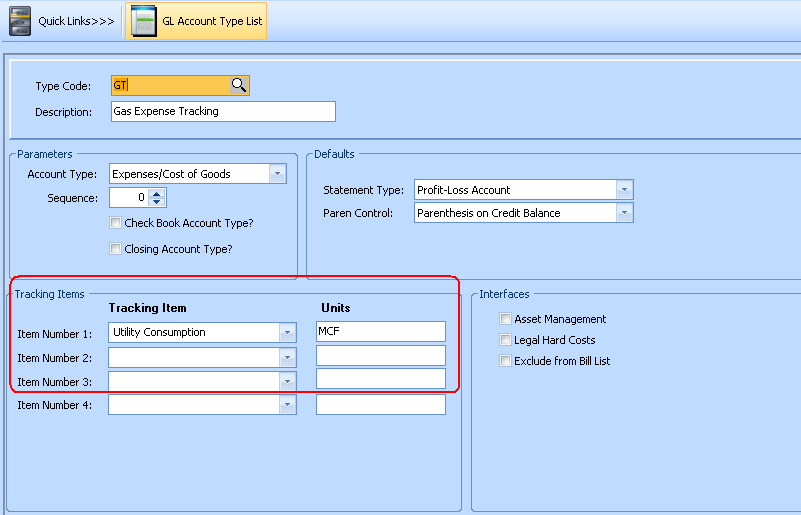
Consumption Type Codes are setup in the Account Type Master
The tracking columns 1-4 tie in with Item Number 1 - 4 in the Account Type Master. In the samples the consumption tracking is Item Number 1 so the consumption information was entered in Tracking1 for the import Excel file.
Sample of an Account Type Master for Consumption:
Sample of a consumption import Excel file is shown below:
![]()
Depending on your Accounts Payable Settings, reference information may default to the same description as the general ledger account description. The default reference may be accepted, changed or a reference may be entered if none is shown.
The system will default this field to the amount shown as remaining. Tab or enter through to accept the amount shown. Change the displayed amount if you need to enter more distribution lines.
If the account number selected is setup to track information in Account Type Master, then one to four Tracking Items will be displayed for the appropriate information to be entered.
Enter the information requested, if applicable.
Depending on the check format, if this field is checked the distribution line will print on the check stub. If the check format does not support this feature, checking or un checking this field will do nothing. Information may print on the check stub without the checkmark if the check format is setup to provide this function.
Tab or enter out of this field to have the line drop down into the window below where it is saved
The distribution window displays the lines that have been completely entered through the distribution entry area.
If the information from distribution entry is not displayed here, it will not be saved.
Some information may be changed in the window or, by double clicking on the information, it may be brought back up into the distribution entry area to edit.
With a transaction type of Non Accounts Payable, a check may be printed before the voucher is posted using this menu option.
Vouchers with other transaction types will generate the following message:
"Transaction Type must be Non Accounts Payable for Manual Check"
When printing manual checks from checkbooks set up with passwords for signatures, an "enter signature password" box will be displayed. Enter the appropriate password to print the signature on the check. If you do not enter a password, the check will be printed without the signature.
After a check has been printed, no further changes will be allowed to the main voucher screen except for the Invoice Description field.
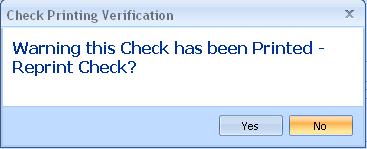
If a check did not print correctly and has to be re-printed a Check Printing Verification box will be displayed with a Yes or No response required.
Non Accounts Payable vouchers are not available for voucher selection and check processing after they have been posted. Checks must be printed before posting the voucher.
********************
Opens a print dialog box. The Print Activity Sheet program can be seen in the background and has the first and last voucher number pre-selected for printing. Select a printer and click Print to print an activity form for the selected voucher.
Note: For Contract Mode 2, 4 and 5 Activity Sheets for a selected voucher number range may be printed from the drop down menu that is available under Voucher Entry.
*********************
Opens a print dialog box. Select a printer and click Print to print a cover sheet for the selected voucher.
***********************
After selecting Cancellation Voucher under Quick Links>>>>Special Vouchers, the Voucher Cancellation Grid will come up.
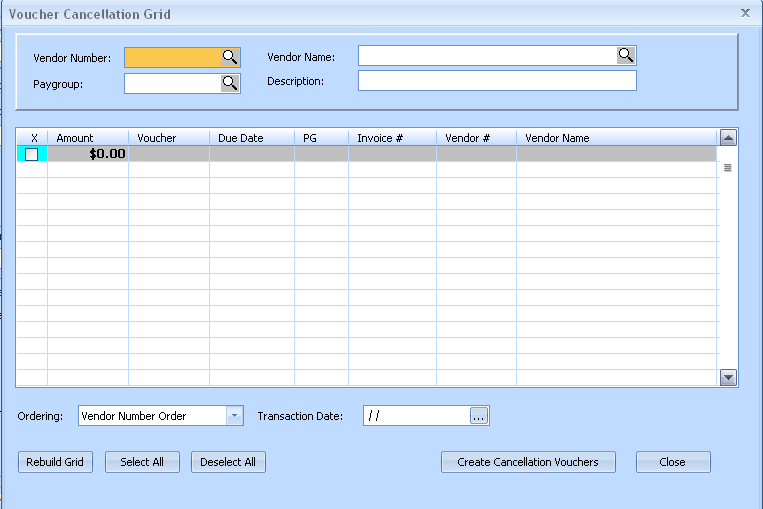
Voucher selections may be made by vendor number, by pay group number or both.
The grid will fill in with open (unpaid) vouchers for the vendor/pay group information that was entered.
The grid can be rebuilt by clicking the Rebuild Grid button if changes are made to the selection option
Select an order to view the vouchers in (optional):
Vendor Number Order
Voucher Order
Due Date Order
Vendor Name Order
Vendor # / Invoice #
Select one or more of the vouchers to cancel by clicking in the box at the beginning of the line. Selected vouchers are indicated by a check mark.
The Select All button will check mark all vouchers shown in the grid.
The Deselect All button will remove all check marks.
Enter or select a Transaction Date (Very Important) for the vouchers.
Click the Create Cancellation Vouchers button
After selecting Void Check under Quick Links>>>>Special Vouchers, the following view will be activated:
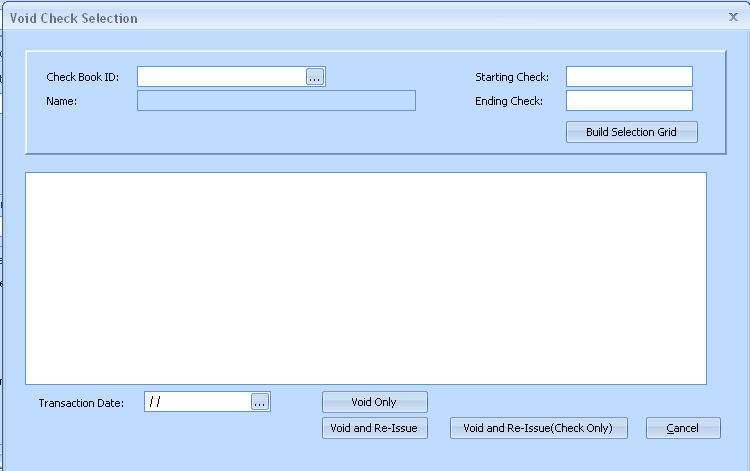
Select the appropriate Check Book ID.
When a check book has been selected the name will be filled in.
After the check book has been selected, enter a check number to be voided and press the Build Selection Grid button.
If the appropriate check number is showing in the grid, this field may be left blank. If you need to void more than one check enter an ending check number in this field and press the Build Selection Grid button.
Use this button to bring check numbers into the grid for selection after a valid check book has been selected and check number information entered.
Select check number(s) to void by clicking in the square to insert a check mark. Check numbers may be unselected by removing the check mark.
If the appropriate check number is not shown in the grid, try entering a different range of check numbers and click the Build Selection Grid button again.
Enter or select a Transaction Date for the voided checks (very important). The Transaction Date cannot be prior to the date of the check or checks that are to be voided.
Use this button to create the negative void voucher if the check will not be reissued or if the check will need reissued for a different amount. (A new voucher will need to be created if you need to reissue the check) The voucher that is created should not be edited.
Use the Void and Re-issue button to create the negative void voucher and a positive voucher to select for check processing.
Once the Void Only or the Void and Reissue process is complete the view will return to AP Voucher Entry.
The positive voucher for reissue may be edited.
Review the AP Voucher Edit List and then Post.
Use the Void and Re-issue (Check Only) button to void the check (creating a negative voucher) and create a new positive voucher for the transaction. These vouchers should not be edited.
Review the edit list and post. The new voucher will be available for voucher selection.
After selecting Manual Voucher Payment under Quick Links>>>>Special Vouchers, select an open voucher to process as manually paid.
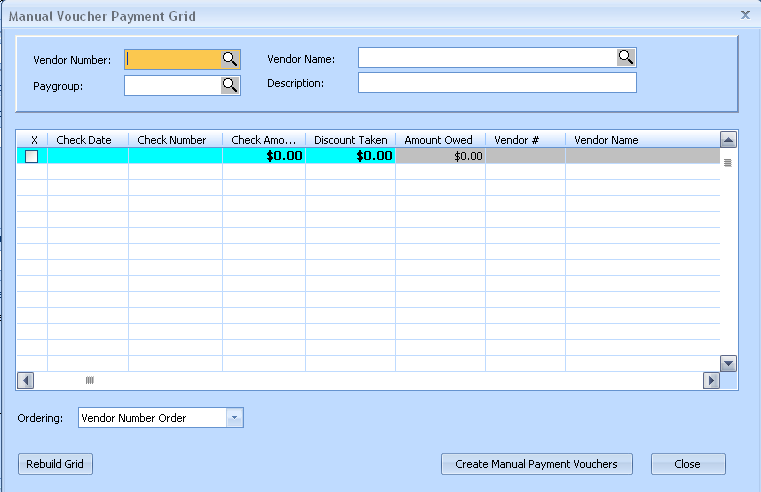
Select by Vendor Number, Vendor Name and/or Pay Group.
Press the Rebuild Grid button to build the grid with the current selections
Arrange the vouchers in the grid by using the ordering option and selecting one of the following (Optional):
Vendor Number Order
Voucher Order
Due Date Order
Vendor Name Order
Vendor # / Invoice #
Select the voucher or vouchers in the grid to create manual payment vouchers by clicking in the box at the beginning of each line to insert a check mark. Deselect vouchers by clicking in the box to remove the check mark.
Click the Create Manual Payment Vouchers button
This view opens when the Contract Mode in Settings is set to Mode 2 and is used to create a voucher to "Pay" an existing open voucher.
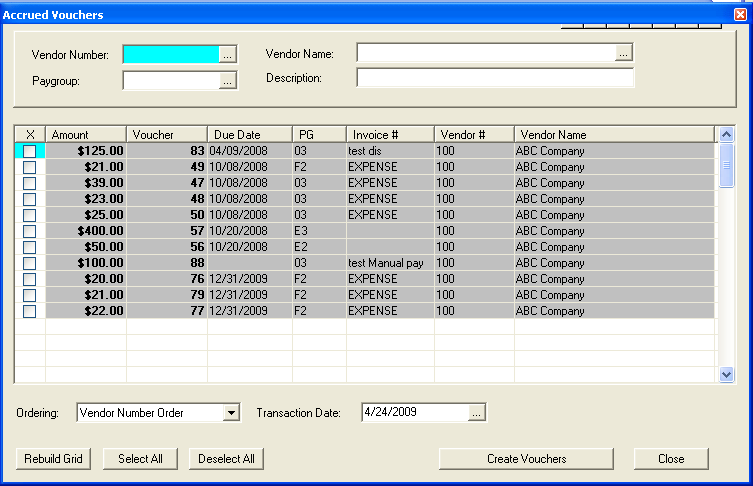
Pull by Vendor Number / Vendor Name or Pay Group and click the Rebuild Grid button
Change how the vouchers are displayed in the grid by selecting an Ordering option (optional):
Vendor Number Order
Voucher Order
Due Date Order
Vendor Name Order
Vendor # / Invoice #
Select the vouchers to be marked as "paid" by clicking in the square at the beginning of the line or use the Select All / Deselect All buttons till you have the vouchers selected.
Enter or select a Transaction Date for the vouchers (Required)
Press the Create Vouchers button to create the payment vouchers and return back to the AP Voucher Entry screen.
If you need to add check numbers/dates to the vouchers pull them up using the Voucher # browse
Checking the Electronic field will insert an "electronic check number" otherwise a regular check number will be inserted when the field is tabbed through. The check number information may be changed.
The following window is only shown after a PO Number/Recv# has been selected and a tab has been done from the Recv# field.
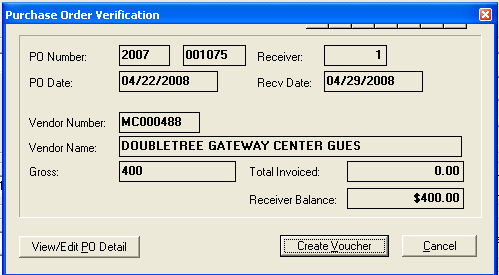
The Purchase Order information is shown. Users may click the Create Voucher button to create the voucher or they may View/Edit the purchase order detail by using the View/Edit PO Detail button.
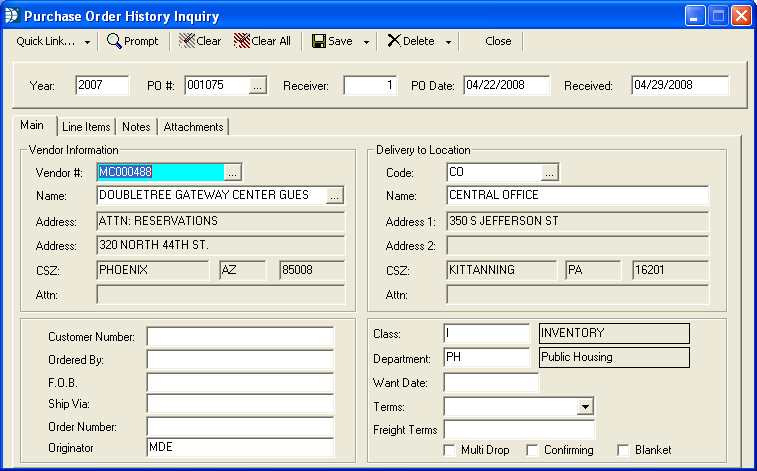
Click this button to open the Purchase Order History Inquiry window where details of the purchase order may be reviewed and edited.
Click this button to create an AP voucher from the purchase order selected.
Review the voucher and save
Continue entering vouchers or proceed on to the AP Voucher Edit List
After reviewing the edit list proceed to Post AP Vouchers