![]()
![]()
Revised: 03/07/2013
Go to Activities>>Process Payroll
This program will process time card information that has been entered, automatically setup or imported for employees and generate payroll checks and/or direct deposit slips and post the information for the pay date selected.
Note:
When an employee deduction has a Deduction/Benefit Master Category of PA Local Work Site, the payroll process will check for the PSD code assigned for the Deduction/Benefit and compare it to the PSD Code in the Employee Master to determine resident or non resident rates. If a comparison cannot be made, the process will withhold the higher percent.
AN ACH direct deposit report and file may also be created if ACH Interfacing is setup in Payroll Settings and one or more employees have direct deposit activated in their Employee Master file.
See Also:
Enter or select the pay date to process.
The pay date should be setup in the Pay Date Master and shown as the current pay in Payroll Settings>>Report Control/AP Control for the Pay Frequency. The system will automatically change to the next payroll date in Payroll Settings once payroll has been processed.
The system will perform a check on the payroll date. If the date is not within one month of the current date, a verification box will appear. Verify the date and click Yes to continue or No to stop and adjust the date.
Note: Due to holidays or non banking days, pay dates may be changed in the Pay Date Master and in Payroll Settings.
Check the pay frequency or frequencies to process. You may select more than one frequency as long as the pay dates are the same in the Pay Date Master and in Payroll Settings>>Report Control/AP Control.
When a pay frequency is checked the time card begin and end dates will be shown in the fields to the right.
For the pay frequency or frequencies selected to process, review the Standard Deduction Cycles displayed. The cycles are usually correct and should not be changed unless a special check run is processed.
If you do not have default deduction cycles setup in the Pay Date Master you may need to select the cycle or cycles to process for the pay.
Options are:
Every Pay
First and Second Pay Only
First Pay of Month
First through Fourth Pay Only
Fourth Pay of Month
Last Pay of Month
Second Pay of Month
Third Pay of Month
User Defined 1
User Defined 2
User Defined 3
Deductions/benefits for each employee are assigned cycles in the Employee Master to control which pay or pays the deduction/benefit will be processed for the employee.
Leave the box unchecked to process all deductions associated with the selected cycles. This box is usually only used for special payrolls.
This check box is used to limit the deductions processed for the current pay to deductions whose setup in the Deduction/Benefit Master includes a check mark in the Mandatory field. Deductions that are not marked as mandatory will not be processed.
Leave the box unchecked to do direct deposit payroll for those employees who are setup for it.
Check the box to print checks for all employees including those who are normally direct deposit.
This check box is only used for special payrolls where automatic direct deposits are not to be processed for any employee. A paper check will be generated and may be printed for all employees with time cards for the pay period processed.
Click the next button at the bottom of the view to continue on to Step 2 of the payroll process. Some of the following processes may occur:
If Auto Ck is check marked in Payroll Settings, a payroll system check is performed on information entered for the pay, and a report is displayed for any information entered incorrectly.
If this is the first time through this screen for this payroll, the system will calculate payroll information for the employee checks.
If you had previously gone through this screen and a calculation has already been done for this pay, an info box will ask "Checks Already Exist - Recalculate?"
Click "Yes" if you need the existing check information removed and a recalculation done. All information for checks that were printed/voided during payroll processing will be removed. Yes should be selected if changes have been made to an employees time card or deduction information and checks have not been printed..
Click "No" if your checks calculated ok and you just need to continue the payroll process.
A date verification box may be displayed if the date is not within one month of the current date. Click Yes to accept the date entered. Click No to correct the date.
Click this button to close the payroll processing program if the process is not to be completed at this time.
While in this screen a report (pre-check writing) may be generated showing the employee's check information. The report may be viewed on screen and printed or sent directly to the printer for review.
Also available from this part of the program is the Payroll Expense Summary. This report requires some additional calculation and can only be printed out.
Shown below is the second screen in the payroll process:
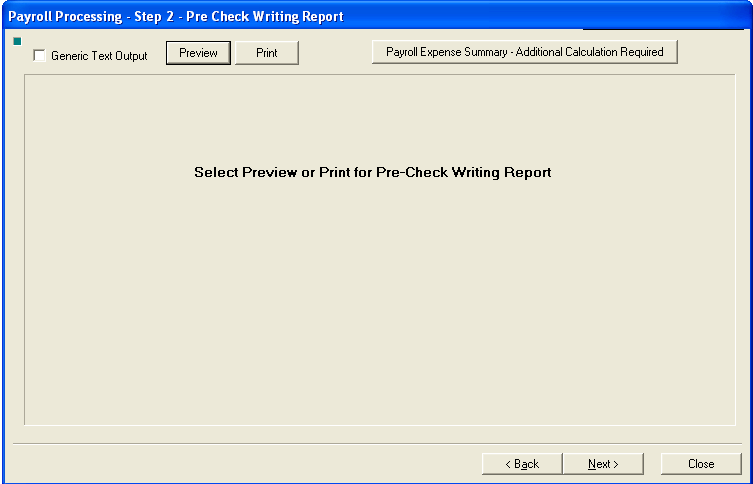
If you are using a dot matrix printer to print the pre-check writing report, clicking in this field to insert a check mark may assist the report to print better.
If you are not having any printing issues, leave this field blank.
Click the preview button to view the pre-check writing report showing information for the employee's checks. From within the preview screen the report can be sent to the printer. For more information on previewing click here.
Click this button to bring up the print dialog box to select and send the pre-check writing report directly to the printer.
Review the information from the pre-check writing report. Close out and correct any information that is incorrect.
This button will generate and print out a report of the employer expenses for the pay.
Review the information for possible errors. Close out of the program if there are any items that are missing or incorrect.
Clicking the back button will take you to the first screen. If you need to make changes for this pay you will need to close out of all the payroll process views to access employee or employer information.
If you go back to the first screen the program will ask you if you want to recalculate when you click next to come back to Step 2.
When you are satisfied that the reports are correct, click the next button to proceed to Step 3 to print out the checks.
Click this button to close the payroll processing program if you need to correct any payroll information.
In step 3 of the payroll process, employee checks may be printed. If your employees are receiving their pay through direct deposit and none are receiving paper checks, this page may be skipped by clicking next at the bottom of the view.
Shown below is screen 3 of the payroll processing program:
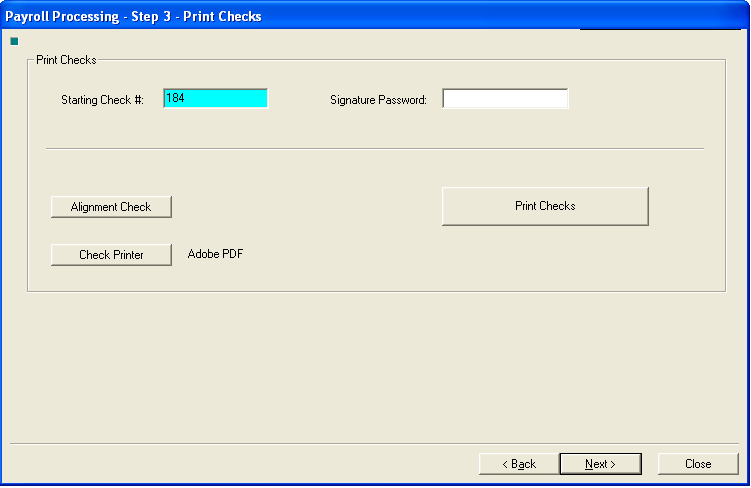
This field displays the default beginning check number for the payroll checks. Check your physical paper checks to verify that the number is correct. If the number is correct, verify that the correct check printer is selected to print the checks.
If the starting check number is not correct, the starting check number may be increased to match the physical checks. If the check number needs decreased, you will need to close out of the payroll program and correct the check number in the Check Book Master if the check number should need decreased.
See Also:
How to Change Check/Electronic Numbers
Enter the password in this field to allow signatures to print on the employee pay checks. If you are not printing signatures on the checks or if the signatures do not need a password, this field may be left blank. Tabbing out of this field takes you to the Print Checks button.
When Print Checks is pressed and a password is required but is not entered or is entered incorrectly a Signature Information box will be displayed with "Signature Password does not match - Print without signature?"
If you click "Yes" the checks will be printed without a signature.
If you click "No" the checks will not print and you will remain on this screen to reenter the password.
See Also:
How to Add Check Signatures
Pressing this button will send a check filled with 9s to the selected check printer to check alignment. A check number will be used in this process and either needs to be cleared in step 4 to allow the check number to be used for printing checks or the Starting Check # will need to be incremented to allow for the used check number.
The selected check printer is displayed to the right of this button. If there is no printer or if the wrong printer is shown, click the check printer button to bring up a print dialog box. Select the appropriate printer to print the checks with.
Press this button to print the checks for this pay.
If all the payroll checks are for direct deposit - no checks will print.
If all the checks were previously printed - no checks will print. Only checks that are listed in step four as "set to print" will print.
When Print Checks is pressed and a password is required but is not entered or is entered incorrectly a Signature Information box will be displayed with "Signature Password does not match - Print without signature?"
If you click "Yes" the checks will be printed without a signature.
If you click "No" the checks will not print and you will remain on this screen to reenter the password.
Pressing this button will take you back to Step 2 of the payroll process.
Click the next button to go to Step 4 of the payroll check process.
Click this button to close the payroll processing program. Payroll will need to be completed and posted at some point.
Check printing status may be reviewed in this step of the payroll process. If the checks have printed correctly and you do not need to clear or void any check numbers, click the next button to move on to the next step.
If your employees are paid through direct deposit and no employees receive a paper check, click next to skip this step. (The screen should be blank)
Shown below is a sample of the screen:
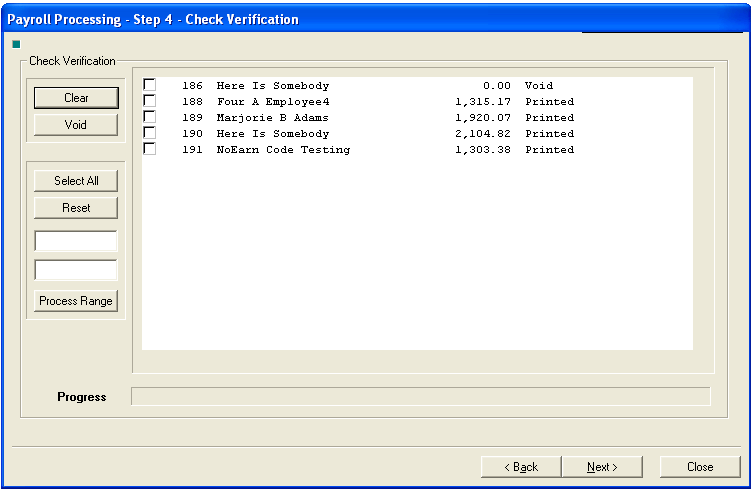
Use this button to clear checks numbers that have been checked. Clearing a check number indicates that the check number is still available for use. Check numbers that have been cleared will set the employee payroll voucher status back to "Set to Print".
Use this button to void check numbers that have been checked. Voiding a check number indicates that the check number is used and is not available for printing. Voided check numbers will be shown in their number increment position and marked as "Void" The employee payroll voucher status will be set back to "Set to Print".
Clicking this button will place check marks in all the boxes indicating that every line has been selected. Individual lines may be un-selected by clicking in the checked box. When a line or lines have been selected the void or clear buttons may be used to process the selected lines.
Clicking the reset button will remove all check marks from the boxes.
The two blank fields are used with the Process Range button for entering a group of check numbers to select or un-select a range of checks.
Use this button with the two blank fields to select or un-select a group of check numbers entered.
In the blank fields, enter a beginning and ending range of check numbers before pressing the Process Range button.
The grid/window displays information for the employee payroll vouchers and or checks. If all the employees are paid through direct deposit, this grid should be blank.
Employees vouchers that are showing "Set to Print" and have a zero check number need paper checks printed due to voided check numbers, cleared check numbers or the checks just have not been printed yet.
Employee vouchers that have an assigned check number and are marked "Printed" should have a check printed. (If the check information was sent to the wrong printer or if the printer jammed - the program will still think the check has been printed)
Check Numbers that have been voided will show a zero dollar amount and will have a status of "Void"
Boxes that are in front of the lines of information may be clicked on to place a check mark in the box indicating that the line has been selected. Lines/check numbers may also be selected using the Select All button and the Process Range button. Once a line or lines have been selected/checked they may be cleared or voided.
This area fills as it is completing the process of clearing or voiding check information to give an indication of how long the process may take.
Pressing this button will take you back to Step 3 of the payroll process to reprint any checks that have been voided or cleared.
Click the next button to go to Step 5 of the payroll check process when you have verified that the checks have been printed correctly.
Click this button to close the payroll processing program.
Step 5 of the payroll process is used to print direct deposit slips for employees. If employees are paid with paper checks and not through direct deposit you may skip this screen and click Next.
Payroll direct deposit information can be processed in one of the following ways:
Direct deposit information can be pulled into the Horizon ACH program to create direct deposit files to send/upload to your bank.
ACH Information can be setup in the ACH and Payroll modules to allow the ACH report and file to be generated during the payroll process.
If ACH is setup to process automatically and a problem occurs to prevent the file from creating. The ACH information should be available in the ACH module to generate a file and report.
Shown below is a sample of the screen:
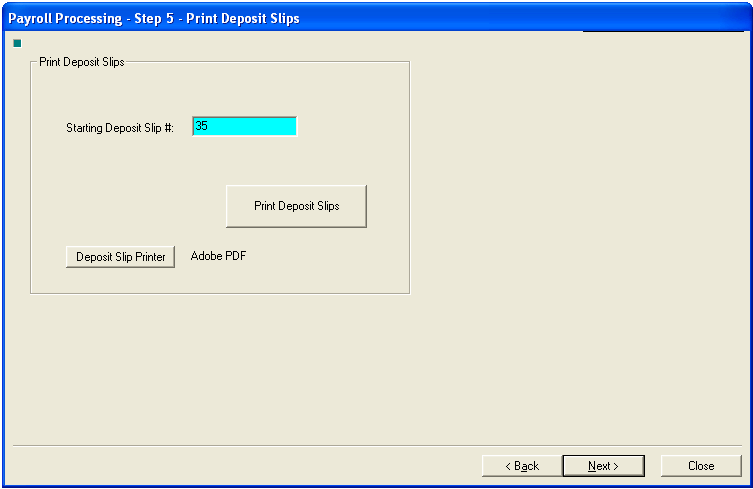
This field displays the default beginning deposit slip number. If the number is correct, verify that the correct printer is selected to print the deposit slips.
If the starting deposit slip number is not correct, the number may be changed by changing the deposit slip number.
The last deposit slip number used is tracked in Payroll Settings on the Direct Deposit tab in the Last Slip # field.
The deposit slip printer is displayed to the right of this button. If a printer is not displayed or if the wrong printer is shown, click the Deposit Slip Printer button to bring up a print dialog box to select a printer.
The deposit slip # and the deposit slip printer should be verified before you press the Print Deposit Slip Button to send the deposit slip vouchers to the printer.
Pressing this button will take you back to Step 4 of the payroll process.
Click the next button to go to Step 6 of the payroll check process.
Click this button to close the payroll processing program.
Deposit slip status may be reviewed in this step of the payroll process. If the deposit slips have printed ok and you do not need to clear or void any slips, click the next button to move on to the next step.
If none of your employees are paid through direct deposit you may click the next button at the bottom of the screen.
Shown below is a sample of the screen:
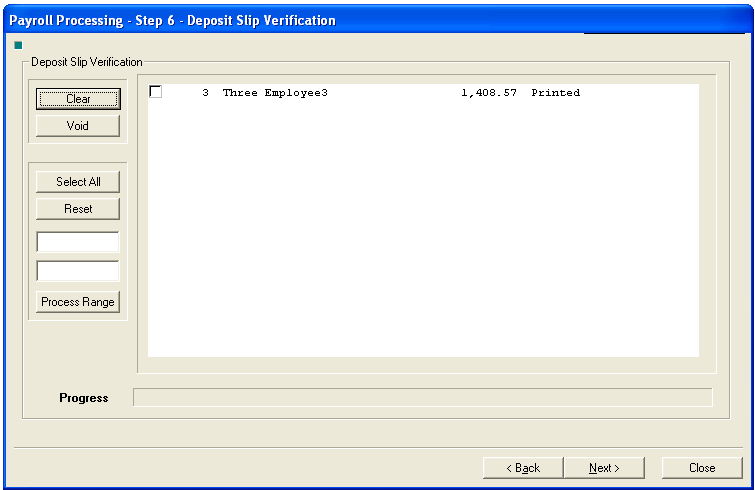
Use this button to clear slips that have been checked. Clearing a deposit slip number indicates that the slip number is still available for use. Slip numbers that have been cleared will set the employee payroll direct deposit voucher status back to "Set to Print".
Use this button to void slip numbers that have been checked. Voiding a deposit slip number indicates that the slip number is used and is not available for printing. Voided slip numbers will be shown in their number increment position and marked as "Void" The employee payroll direct deposit voucher status will be set back to "Set to Print".
Clicking this button will place check marks in all the boxes indicating that every line/deposit slip has been selected. Individual lines may be unselected by clicking in the checked box. When a line or lines have been selected the void or clear buttons may be used to process the selected lines.
Clicking the reset button will remove all check marks from the lines.
The two blank fields are used with the Process Range button for entering a group of deposit slip numbers to select or un-select a range of checks.
Use this button with the two blank fields to select or un-select a group of deposit slip numbers entered.
In the two blank fields enter a beginning and ending deposit slip number as the range to process with the Process Range button.
The grid or window displays information for the employee payroll vouchers and or deposit slips. If all the employees are paid with printed checks, this grid should be blank.
Employees vouchers that are showing "Set to Print" and have a zero slip number need deposit slips printed due to voided slip numbers, cleared slip numbers or the deposit slips just have not been printed yet.
Employee vouchers that have an assigned slip number and are marked "Printed" should have a deposit slip printed. (If the deposit slip information was sent to the wrong printer or if the printer jammed - the program will still think the deposit slips have been printed)
Deposit Slip Numbers that have been voided will show a zero dollar amount and will have a status of "Void"
Boxes that are in front of the lines of information may be clicked on to place a check mark in the box indicating that the line has been selected. Lines may also be selected using the Select All button and the Process Range button. Once a line or lines are selected they may be cleared or voided.
This area fills as it is completing the process of clearing or voiding deposit slip information.
Pressing this button will take you back to Step 5 of the payroll process to reprint any deposit slips that have been voided or cleared.
Click the next button to go to Step 7 or to Accounts Payable Checks, depending upon Payroll Settings for Automatic Processing of Payroll Checks.
Click this button to close the payroll processing program.
If you have the Automatic Processing of Payroll Checks field checked in Payroll Settings, then the Accounts Payable Checks interface will be a part of the payroll process.
The window/grid will display Accounts Payable information related to the payroll process that have checks printed.
The following information will be displayed in the grid:
Code
Description
Employee Amount
Employer Amount
Vendor Name
Process Mode
Vendor Number
Changes can be made within the grid to the following fields:
Employee Amount
Employer Amount
Process Mode
Click this button to begin the process of paying Account Payable vouchers. This will bring up the following interface:
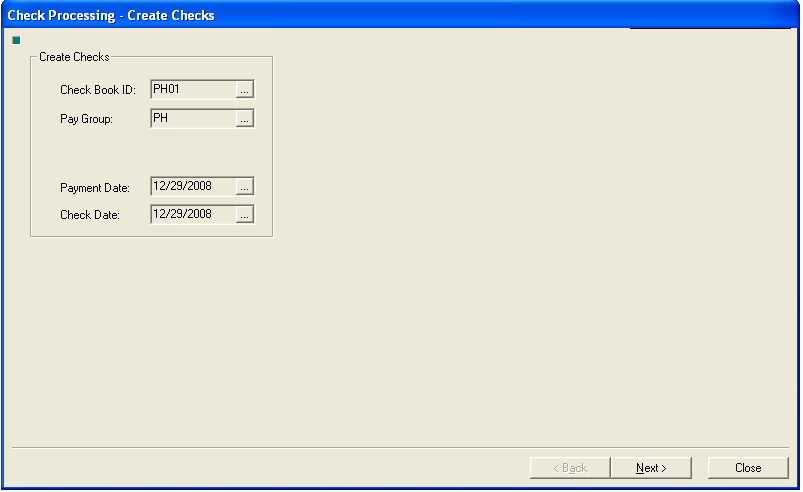
The dates are filled in based on information for this payroll.
Click the Next button to continue or Close to return to Payroll Processing.
Click the Next button to continue processing Account Payable vouchers.
Verify the beginning check number.
Enter a password, if applicable. If signatures will not be printed on these checks, the password may be left blank.
Click the Alignment Check button only if your checks need to be aligned in the printer.
A printer should be displayed to the right of the Check Printer button. If a printer is not displayed, click the Check Printer button and select the printer.
Click the Print Checks button, after verifying the printer, to begin printing the accounts payable checks.
If a required password was not entered or if entered incorrectly an information box will ask "Signature Password does not Match - Print without Signature?"
Select Yes if the check is to be printed without the signature.
Select No to return to the Print Checks view and enter the required password.
Verify that the checks have been printed correctly and press Next to continue.
Check printing status may be reviewed in this step of the payroll accounts payable process. If the checks have printed correctly and you do not need to clear or void any check numbers, click the next button to move on to the next step.
This screen is similar to the other verification screens within the payroll process.
Use this button to clear checks numbers that have been checked. Clearing a check number indicates that the check number is still available for use. Check numbers that have been cleared will set the accounts payable voucher status back to "Set to Print".
Use this button to void check numbers that have been checked. Voiding a check number indicates that the check number is used and is not available for printing. Voided check numbers will be shown in their number increment position and marked as "Void" The accounts payable voucher status will be set back to "Set to Print".
Clicking this button will place check marks in all the boxes indicating that every line has been selected. Individual lines may be unselected by clicking in the checked box. When a line or lines have been selected the void or clear buttons may be used to process the selected lines.
Clicking the reset button will remove all check marks from the boxes.
The two blank fields are used with the Process Range button for entering a group of check numbers to select or un-select a range of checks.
Use this button with the two blank fields to select or un-select a group of check numbers entered.
In the blank fields, enter a beginning and ending range of check numbers before pressing the Process Range button.
The grid/window displays information for the accounts payable vouchers and or checks.
Accounts Payable vouchers that are showing "Set to Print" and have a zero check number need paper checks printed due to voided check numbers, cleared check numbers or the checks just have not been printed yet.
Accounts Payable vouchers that have an assigned check number and are marked "Printed" should have a check printed. (If the check information was sent to the wrong printer or if the printer jammed - the program will still think the check has been printed)
Check Numbers that have been voided will show a zero dollar amount and will have a status of "Void"
Boxes that are in front of the lines of information may be clicked on to place a check mark in the box indicating that the line has been selected. Lines/check numbers may also be selected using the Select All button and the Process Range button. Once a line or lines have been selected/checked they may be cleared or voided.
This area fills as it is completing the process of clearing or voiding check information to give an indication of how long the process may take.
Pressing this button will take you back to Print Checks view of the accounts payable process to reprint any checks that have been voided or cleared.
Click the next button to go to Post Checks of the payroll accounts payable process when you have verified that the checks have been printed correctly.
Click this button to close the accounts payable processing program.
Clicking the Back button to return to the accounts payable check verification screen.
Click the Post button to post the accounts payable information and return to payroll processing. The posting register will be sent to the printer during this step.
Click the close button to close out of the accounts payable program without posting.
The payroll process is not complete until payroll information has been posted.
Shown below is a sample of the screen:
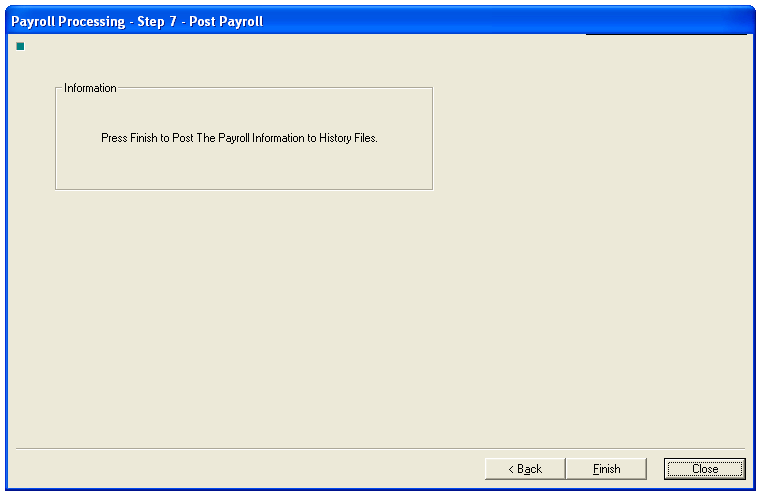
Click the back button on screen 7 to go back to Step 6.
Click this button to post the payroll information. Once the payroll has posted a Process Complete info box will be displayed asking if the user wants to print the Check Register/Reports. It is recommended that users print out the payroll posting reports at the time of posting.
Click "Yes" to bring up the payroll Check Register program.
Click the Preview button to review the reports on screen. The report may be printed from within the preview screen or the preview may be closed and the Print button may be used. Click here for more Preview information.
Click "No" to close the program without printing the payroll reports.
After payroll is posted the following may take place:
Additional reports may print out based on Automatic Report Controls in Payroll Settings and the Deduction/Benefit Master.
The Tax Liability Summary Report will print
An ACH report may be printed and an ACH file created based on ACH and Direct Deposit Information in Payroll Settings and the Employee Master.
If setup for DocumentViewer, a Send to DocumentViewer Now? pop up will be displayed. Click Yes to send the payroll information to the documentviewer.
Click this button to close the payroll processing program without posting. When coming back into the program to finish the payroll process and post, do not recalculate checks as the recalculation process will erase all the check information for the payroll you wish to post.
Note: When payroll has posted the Current Pay information, for the pay frequency processed, will be updated in Settings>>Payroll Settings on the Report Control/AP Control tab.
When the last pay of the year is processed the current pay information cannot be updated for the new payroll year. The Current Pay field must be manually updated for the first pay of the year when the new Pay Date Schedule is created in the Pay Date Master
See Also: